[Fixed] IRQL Not Less or Equal Ryzen (100% Working)
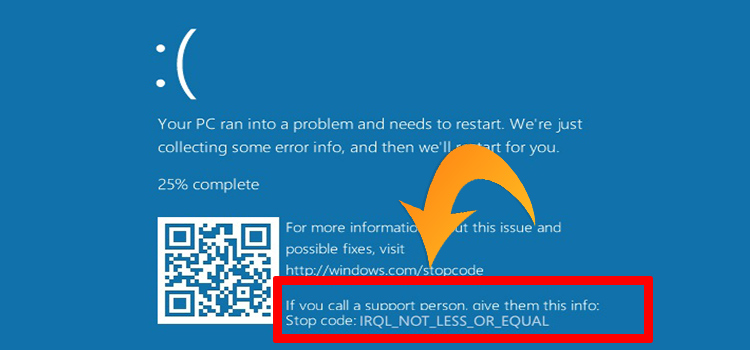
IRQL (Interrupt Request Level) not less or equal Ryzen-based error is the most common issue faced by the user. But, you can find to the point applicable solutions rarely.
Fortunately, you have come to the right place. The article is fully written on a couple of proven solutions. So, you do not need to go here and thereafter follow these fixed guidelines.
So, no more delay. Let’s explore.

What does IRQL Not Less or Equal Mean?
The error is nothing but a Windows system error which is known as a blue screen error or blue screen of death (BSOD). The error may occur at any time and crash the system, but have a specific reason to occur.
What Causes IRQL-Related Errors?
The error can occur due to various factors. Most of the time the root cause of the problem is device driver corruption. If the PC has any outdated drivers in your system then the possibility of this kind of Windows stop error is pretty high.
Drivers link up your hardware and software, and if you have outdated drivers then your system face communication issue between hardware and software, and you face this type of issue.
So you can face the ‘blue screen of death‘ error from both ends software and hardware. Now, let’s recap the causes-
- Damaged system files.
- Outdated device drivers
- CPU Cooling system damaged
- Hardware issues like hard drive, Ram, Graphics card, or others.
How Do I Fix ‘IRQL Not Less or Equal Ryzen’ Error
Whatever the reasons are, the error is fixable. Here we will troubleshoot the error and give you the best easy fixing solutions for the Windows stop code. Before that, let’s check the list of the fix first.
- Fix 1: Run Windows Memory Diagnostic
- Fix 2: Run chkdsk
- Fix 3: System Restoration
- Fix 4: Scan the Full System
- Fix 5: Use Windows Troubleshooter
Fix 1: Run Windows Memory Diagnostic
Firstly, you need to run Windows Memory Diagnostic for scanning System Memory to fix any kind of memory-related problem. To do so, you can follow the below simple steps.
Step 1
First, you have to tap the Windows button and search ‘Windows Memory Diagnostic’. Consequently, the preface will appear. You have to click on it.

Step 2
Accordingly, a new popup box will appear with two options. From here, choose the ‘Restart now and check for problems’.
As your command input, the system will be automatically rebooted.

Step 3
If you have Ram-related issues, you should replace the RAM to solve this error. On the other hand, if you have no issue with your system memory, you will need to follow the next step.
Fix 2: Run chkdsk
Your next step will be to check your hard drive for searching the corrupted system files. To do so, you just need to scan your hard drive thoroughly to complete this process. I will attach the fix step by step below.
Step 1
Tap the Windows key and type ‘command prompt’. Accordingly, the preface of the Command Prompt will be visible in the right sidebar. Choose the ‘Run as administrator‘ from the appeared options.

Step 2
Consequently, the ‘Command Prompt’ window will become evident. You have to copy the below command and paste it into the window.
chkdsk c: /f/x/r

Then press enter.
Now your hard disk C drive will be scanned thoroughly for corrupt system files.
Repeat the same process for other hard drive partitions. If the system finds any corrupted files on your hard drive. This process will solve the problem if you have any corrupted files on your hard drive.
Fix 3: System Restoration
If you still facing the same problem then you may restore or refresh your system. To restore your system follow the steps given below.
Step 1
Open your windows search bar and type for ‘system restore’. Accordingly, you will get the ‘Create a restore point’ option. You have to click on it.

Step 2
Consequently, the ‘System Properties’ window will pop up. From here, you have to click on the ‘System Restore’ button. Then click on the ‘Next’ button.

After that, you can see various restore points and you have to choose one with the date that was before you started seeing this blue screen death problem and click on the ‘Next’ button.
Finally, click on finish to complete this action of the restoration process. Once it has been completed, restart your system and check the error’s existence.
Fix 4: Scan the Full System
To apply this fix, you need a strong antivirus program. If you don’t have any paid version antivirus then you can use ‘Windows Defender’ to troubleshoot the problem.
Step 1
Go to your windows search option and search for ‘windows security’. Then look at the right side pane of the Start menu. You will find the ‘Virus and threat protection’ option on the appeared list. You have to click on it.

Step 2
Accordingly, the Windows Security window will become evident. You need to click on the blue-colored ‘Scan options’.

Step 3
After that, select the ‘Full scan’ first then click ‘Scan Now’.

Accordingly, the scan will be started. It may take several minutes to scan all of your system files. If the process finds any error, it will immediately solve the problem.
Fix 5: Use Windows Troubleshooter
To scan all of your hardware components you need the help of a Windows troubleshooter. to do this follow the steps given below.
Step 1
Re-open your ‘Administrator: Command Prompt’ window and type ‘msdt.exe-id devicediagnostic’. Then hit the ‘enter’.
Step 2
Accordingly, the troubleshooter page will pop up. You have to click on the ‘Next Button’ to submit the command.
It will automatically scan all of your systems to find any hardware error. And take automated initiative according to the finding.
Can RAM cause IRQL not less or equal?
Faulty Ram can cause IRQL not less or equal. The damaged system Memory and RAM is one of the major reasons behind this error.
Final Words
In the end, I would hope that you get rid of the error IRQL not less or equal Ryzen after applying the provided guidelines.
Subscribe to our newsletter
& plug into
the world of technology


