[Fix] GTA V Screen Tearing with VSync On (100% Working)
Confronting the GTA V screen tearing with VSync on error is a painful happening indeed. In fact, it is one of the awkward errors while VSync generally helps gamers to stop screen tearing. Whereas people like you face the error at the time of playing GTA V only.
However, the error is even solvable and you have come to the right place indeed. I will explain the error in detail with the relevant solutions in the entire article.
Before jumping to the main point, I would like to inform you that the article might be too long. But I promise it will be worthy. Let’s explore.
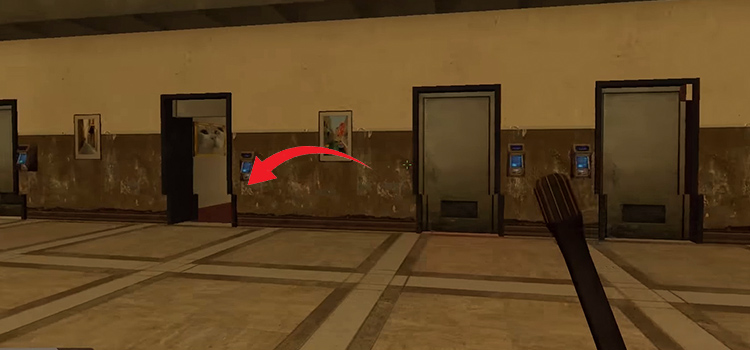
What is Screen Tearing?
Screen tearing is a horizontal split at single or multiple places of the visual screen. Basically, it occurs due to the desynchronization of the GPU’s frame rate and monitor’s refresh rate.
In general, you can resolve screen tearing issues by enabling VSync. But it will be a disturbance fact when screen tearing is getting visible with VSync on. Here, I will discuss the situation to help you to get rid of the issue.
What Does VSync Do?
VSync is working as a matchmaker of the GPU’s frame rate and monitor’s refresh rate to ensure the most possible visual synchronization. So, from this point of view, you need to turn on the VSync feature while playing games or watching something like a 3D scene.
But you have to think twice when facing trouble in playing games like GTA V and so on while turning on the VSync. Let’s discuss the awkward issue in detail.
Why Are You Getting Screen Tearing with VSync On?
Yes, it is awkward when you are getting screen tearing with VSync on. There are a couple of reasons for occurring the error. These are-
- The main and most possible reason hiding behind the occurrence is the framerate mismatch between GPU and monitor.
- Another thing that may cause the screen tearing is if FPS drops below the monitor’s refresh rate.
How to Stop GTA V Screen Tearing with VSync On?
To ensure the smooth playing of your favorite GTA V, you have to stop the screen tearing happenings. Here, I have gathered several fixes for you to resolve the unwanted error. Before disclosing the fixes in detail, let’s check the list first.
- Fix 1: Re-enable VSync
- Fix 2: Turn Off VSync
- Fix 3: Enable Some Related Feature
- Fix 4: Ensure Proper FPS
- Fix 5: Try Limiting Refresh Rate
- Fix 6: Activate Window Mode
- Fix 7: Change Display Settings
- Fix 8: Customize Game Mode Settings
- Fix 9: Rolling Back to the Previous Driver
Fix 1: Re-enable VSync
The first thing you may try is to re-enable VSync. This means you have to disable the feature at first, then enable it again a few moments later. You can do it by using your GPU-based system manager.
Now, check the existence of the issue. In case, you still face it, you will need to follow the next fixes.
Fix 2: Turn Off VSync
When VSync doesn’t perform appropriately while playing GTA V, you have to turn off the VSync to resolve the issue. Hopefully, you will play GTA V errorlessly.
But in some cases, the fix is not enough to assist you to get rid of the error. Then you have to try some other ways to resolve it.
Fix 3: Enable Some Related Feature
As a consequence, you have to enable Triple buffering and adaptive VSync from the control panel.
The process will work as an alternative way of turning on VSync. It will help to match the GPU’s frame rate and Monitor’s refresh rate.
Fix 4: Ensure Proper FPS
To get rid of the screen tearing, you have to ensure an upper FPS value than the monitor’s refresh rate. It is an alarming fact indeed. If you ignore it and the FPS drops below somehow, the error will appear and make a barrier to playing your favorite GTA V smoothly.
You can monitor the FPS measurement easily from your GPU’s control panel. So, you can try the fix if the upper fixes do not help you.
However, there are some other steps you may need to take to resolve the discussed issue. Let’s move on.
Fix 5: Try Limiting Refresh Rate
Limiting the refresh rate manually can help you to avoid the barrier of playing the game smoothly. Moreover, you have to avoid input maximum settings that may not capture your PC and damage the hardware by producing overheating.
I would like to recommend following the existing fixed guideline almost all the time to ensure better PC health. However, it may not give you an instant solution if you confront the screen tearing problem in a bad way.
According to your condition, you may need to work with a couple of windows related fixes. I will expose them below.
Fix 6: Activate Window Mode
When nothing helps you to get rid of the screen tearing, you may activate the Window mode as well as minimize the full screen. In most cases, gamers found the process as the best alternative way to play games avoiding the error. You can follow the below steps to activate the Window mode.
Step 1
Right-click on the game launcher desktop icon and click on ‘Properties’ from the appeared menu.

Step 2
Accordingly, the ‘Properties’ window will appear. Look at the menu bar. From here, you need to tap the ‘Compatibility’ tab.
After that, tick mark the ‘Disable fullscreen optimizations’ checkbox. Then hit the ‘Apply’ and ‘Ok’ at the end.

Step 3
Now, you have to restart your PC and re-open the game to check the existence of the screen tearing error.
There are still some other alternatives you may try to resolve the issue. Let’s check.
Fix 7: Change Display Settings
I have studied some cases where gamers have gotten relief from the error by changing some Display settings. You may also try if you still confront the error. I will explain the changing process in detail with some chronological steps.
Step 1
First, you need to tap the Windows and ‘S’ keys together. Then write ‘settings’ on the search box. Accordingly, the preface of the ‘Settings’ app will become evident on the screen. You have to open it.

Step 2
Then you have to select the ‘System’ section from the ‘Settings’ list.

Step 3
To continue the process, you have to tap the ‘Display’ tab from the left-side menu of the newly appeared ‘System’ window.
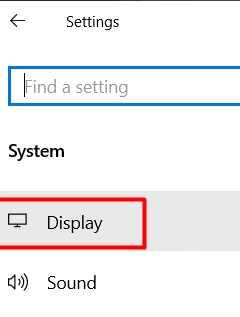
Step 4
Next, give your concentration to the right-side pane. Scroll down and click on the blue-colored ‘Advanced display settings’ option.
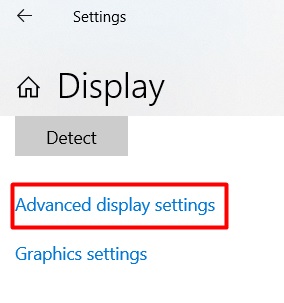
Step 5
Now, you have reset the ‘Refresh Rate’ as your game requirement. You may need to adjust it by increasing 60+ Hz to ensure the lag-less smooth motion of the gaming visual.
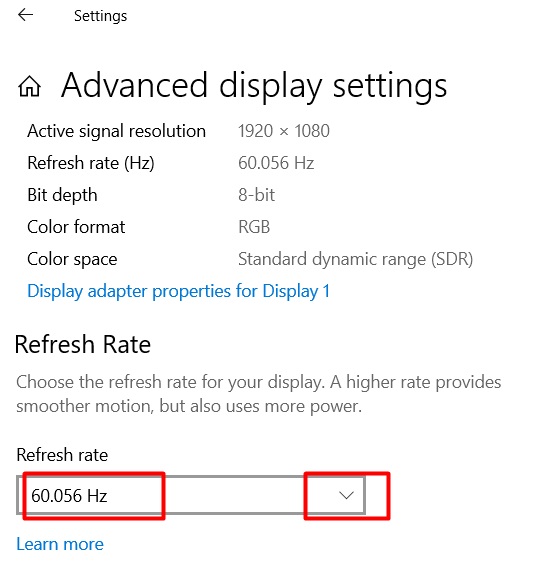
Like changing Display settings, you can also customize the Game Mode settings to resolve the issue. The process is easy to apply.
Fix 8: Customize Game Mode Settings
It’s a long way since you still have been suffering from the screen tearing. Thus, let’s try the fix and check if it helps you or not. You need to follow the below steps to customize Game Mode settings.
Step 1
You need to open the Windows’ ‘Settings’ app to execute the fix.
Step 2
After that, find and select the ‘Gaming’ section from the appeared list on the ‘Settings’ interface.

Step 3
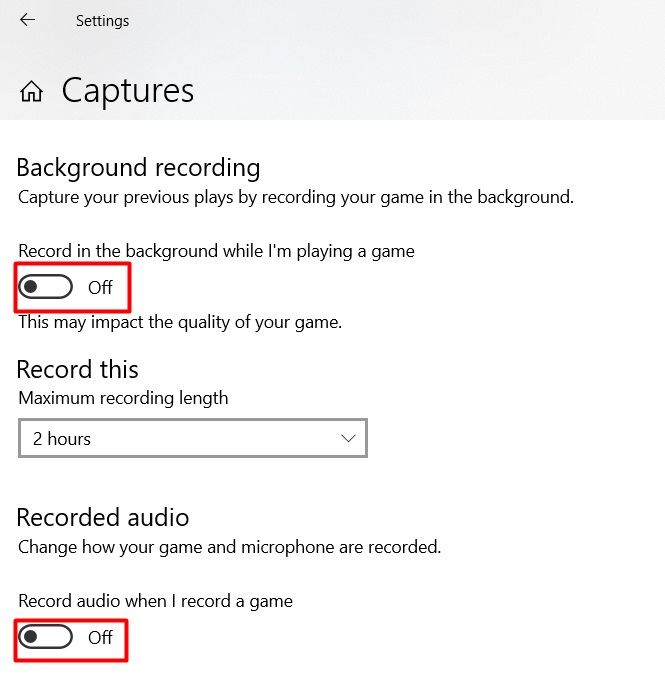
Then look at the left-side menu bar of the newly appeared ‘Gaming’ window. Here you need to work with ‘Game Bar’, ‘Captures’, or ‘Game Mode’ to change some settings. It may vary from different device to different device.

For example, tap the ‘Capture’ tab.
Step 4
Next, check the right side pane. You have to toggle ‘Off’ the ‘Background recording’ and ‘Recorded audio’ features. Finally, restart the computer and enjoy the gaming smoothly.
It will be a hopeless reality if you still confront the trouble. But, I have the last option for you to resolve the error.
Fix 9: Rolling Back to the Previous Driver
After failing to resolve the screen tearing error while trying almost all possible solutions, there is last hope for you. In most cases, it has given positive results. So, check the step-by-step process. Apply and get rid of the smooth gaming disturbance.
Step 1
Tap the Windows and ‘X’ keys together and click on the ‘Device Manager’ option. You will find it on the upper side of the appeared list.

Step 2
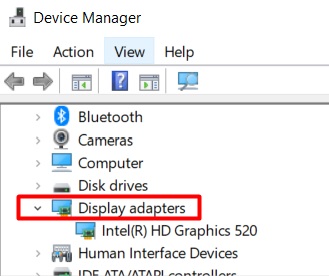
Accordingly, the ‘Device Manage’ window will become evident. From the displayed list, you have to expand the ‘Display adapters’ section. Then, double-click on the GPU driver that you want to roll back to the previous one.
Step 3
As a result, the driver properties will appear on the screen. You need to tap the ‘Driver’ tab from the upper menu bar. After that, select the ‘Roll Back Driver’ section to execute the operation. In the end, you need to press ‘Ok’ to submit the confirmation.
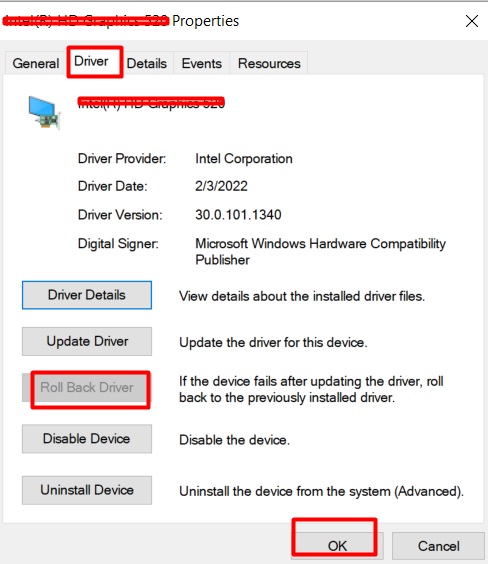
Finally, you will roll back to the previous driver. Now, restart the PC and enjoy happy gaming.
Final Words
In the end, I hope that you would get rid of the GTA V screen tearing with VSync on error after following the provided guidelines. As a shortcut solution, I would like to prefer fix no. 6. Now, share the preference that helps you the most.
Subscribe to our newsletter
& plug into
the world of technology


