[4 Fixes] why is my mouse so slow all of a sudden
After upgrading to Windows 10, whether you’ve noticed that your mouse frequently experiences latency or hangs, you’re not alone in having this problem. This issue has been brought to the attention of a significant number of Windows users. However, you shouldn’t be too concerned because you can’t keep putting up with that for too long. We are here to support you resolve your mouse slowdowns with detailed instructions that show exactly what you have to do to get things back to normal.
The slowness that your mouse experiences when using Windows 10 is very frustrating. It may reduce the amount of work you get done or cause you to make mistakes even when you are going to prepare documents as well as play computer games.
Reasons Behind Why My Mouse So Slow All of a Sudden
That mouse movement becomes obvious in a number of common cases, including the following:
- When you are playing computer games, you may notice that certain game features no longer respond fluently to the motions of your mouse.
- Whenever you scroll any Word doc, the toolbar stops moving, ignoring the fact that you are still moving.
- When you are presenting a speech using PowerPoint, the cursor of your mouse comes to a stop, even when you are still moving the cursor.
- Since a system isn’t reacting to your keystrokes, you choose to hit a software menu or a hyperlink on a website 2 to 3 times each.
In general, if you have a lot of programs open and operating in your system, you may experience a slowdown in performance. Therefore, ensure that all other applications are closed when going to check your mouse or try any of the repair tips that are mentioned below.
How Do You Fix a Slow Mouse
There are some easy and simple methods to fix the problem. You have to follow the steps properly o fix the issue.
Method 1: Reinstall the Mouse Driver
Consider using the mouse at different computers to verify if you still experience slowness or stuttering before you start. Your mouse and its driver may be faulty if you can use it without issue on another desktop. Follow the steps below to remove the fault.
Step 1: From your keypad, simultaneously press the Windows key + letter X. Keep pressing the bottom arrow key till Device Manager appears in the menu. Click on Enter.
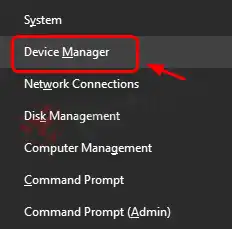
Step 2: After pressing Tab, you have to scroll down to navigate through the list of pointing devices till you find Mouse and other pointing devices. To display additional customization options, click on the option.
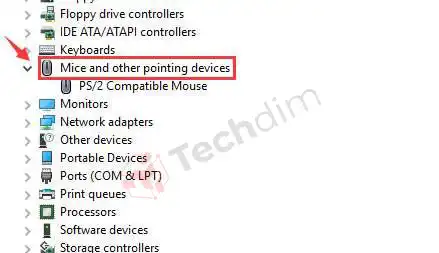
Step 3: Select your mouse name by pressing from the list, and then hit the Enter button.
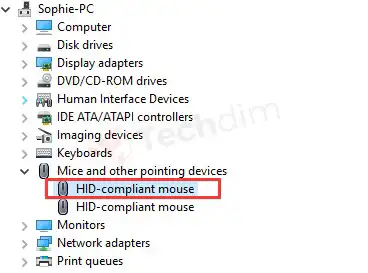
Step 4: You have to navigate here to the Driver section. You will find the option at the top of the window. Hit on the Uninstall Device option that appears at the bottom.
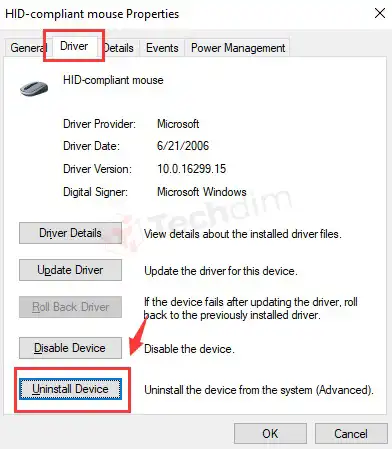
Step 5: After that, hit the enter key.
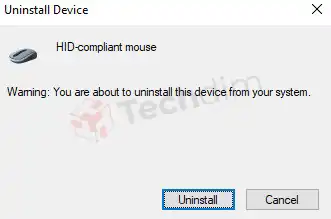
Step 6: If you are ready to continue using your computer but are asked to restart it, click the Enter key. If this is not the case, you can reboot your pc by pressing the Tab key.

Step 7: If you do not want to immediately restart your system, navigate to the taskbar in Device Manager then select the Scan of hardware changes button.
In the situation that you are unable to use your mouse at this time, you can initiate the scan by pressing the F5 button from your keypad.
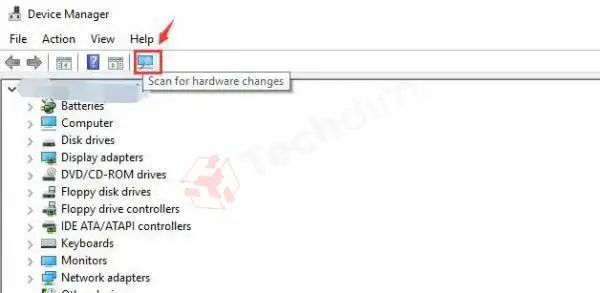
Windows will walk you through the process of reinstalling your mouse drivers on your computer.
Step 8: Check to see if the issue with the slowness of your mouse has been resolved. You can go on to the next method if the issue continues.
Method 2. Make Sure the Driver for Your Graphics Card Is up to Date
It’s also possible that the problem is due to an expired driver for such a graphics card. You can fix the issue by installing the most recent version of your display driver. You can choose to upgrade your graphics card either manually or even automatically, depending on your preference.
Driver updating manually— If you want to update the drivers for your GPU in a manual process, you may do it by navigating to the website of the company and looking for its latest edition of the relevant driver. Ensure that the drivers you select are suitable for the windows 10 which you are running.
Automated driver updating: When you do not have enough time, and technical skills needed to update your driver in a manual process for your GPU, you can just use Driver Easy to perform this task automatically for you. Here the steps below –
Step 1: Get Driver Easy and set it up on your computer.
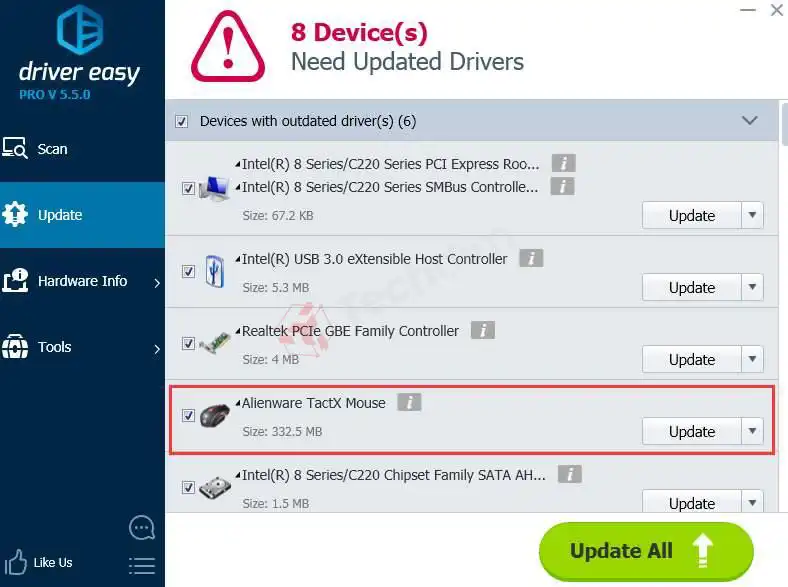
Step 2: Start Driver Easy and then select the Scan Now option on the main menu. After that, Driver Easy will do a scan of your pc to look for any problematic drivers.

Step 3: To have the newest edition of your driver downloaded and installed automatically, hit the Update option. you will find this option just beside the mouse device. Here, you can also find a free version to do this.
Alternatively, you can select Update All to have the program auto-install the most up-to-date versions of all the device’s absent or outdated drivers. This feature is exclusive to the Pro edition and you would be asked to upgrade if you choose Update All.
Method 3: Check Out the Local Area Network Settings
It’s probable that turning off your local area network and utilizing your wifi adapter to the internet connection will help you fix the issue. You can perform it in the following ways:
Step 1: To proceed, tap the Windows key + letter R from the keypad simultaneously, then write control here then hit the Enter button.

Step 2: Tab, and after that enter, to proceed. After selecting Small icons using the left key, next hit Enter to finish.

Step 3: Using the Tab button on the keyboard, navigate to the Network and Sharing Center till it is visible.

Step 4: Use the Tab key to navigate until you see the option to Change adapter settings. After that, hit the enter key.

Step 5: You may display your LAN connection by pressing Tab till it appears. To choose it, use the left button key on your keyboard. After that, hit the enter key.

Step 6: To disable the feature, hit Tab till it is highlighted. Tap Enter.

Step 7: You would then be brought back to the Network Connection panel, where the symbol representing your Ethernet interface will be marked. To activate your connection, click the Enter key.
Method 4: Disable the Realtek Audio
It’s likely that the interference coming from your Realtek sound device is to blame for the slowness of your mouse. The following is the solution to your problem:
Step 1: While simultaneously pressing the Windows key+ the letter X, navigate to the Task Manager.

Step 2: Use the down tab key before the Realtek audio.exe program comes up in the search results. Hit on the End Task.
Step 3: While pressing the down arrow key, navigate to the directory where Realtek audio.exe is stored. Hit the End Task.

If none of the procedures described above are successful, test the Task Manager on your computer for any hints as to which programs might be caused. It is important to handle the case if they take up a significant amount of space on the disk. Whenever you find any unusual activities, right-click it and select the End Task option to verify whether if mouse latency issue is fixed.
Bonus Tips: You Can Give a Try on the Following Steps to Solve Your Problem
Effective tips are shown to perform. Let’s see.
1. Deactivate Cortana:
It has been reported by a number of users that removing Cortana worked to solve the mouse not working properly when it froze.
2. Stop the ATI HotKey Poller Service from Running:
A large number of users have also claimed that the ATI Catalyst cards, which include an ATI HotKey Poller program, can generate latency in the mouse in special requirements of the system. Simply turn off this function when you do not require the use of the ATI hotkeys.
You Can Perform It in the Following Ways
Step 1: To open the Services menu, tap the Windows key + letter R simultaneously, then enter services.msc and hit the Enter key.

Step 2: Navigate to the right corner of the panel and look for the ATI HotKey Poller service. After that, you have to double-click on it.
Step 3: The Properties box will appear before you at this point. Make sure that the Startup type is set to Disabled. After that, select Apply, and OK.

Step 4: Then, restart the pc.
Conclusion
If you are facing this type of slowness of your mouse, don’t worry. There are several causes that can generate this issue. So, try to find the reason behind this problem and fix it with the corresponding method. Before applying any method, check your operating system.
Subscribe to our newsletter
& plug into
the world of technology
