[5 Fixes] Toshiba Satellite Wifi won’t Turn on Windows 10
The Internet has made our life so easy and comfortable. You can find out anything in this virtual world within a second. If you’re reading this article then you must be experiencing a Wi-Fi issue on your Toshiba Satellite laptop. Right?
Then, there is nothing to worry about as we’re here with the solution to help you to fix the Wi-Fi issue on your Windows 10 Toshiba Satellite laptop. The methods are easy and will take a couple of minutes to fix your issue.
So, what are you waiting for? Let’s hop in to dig out your solution now.
Reason Why Wi-Fi Is Not Turning on Toshiba Satellite Windows 10 Laptop
Before going to the solutions, it’s better to know what is causing the Wi-Fi issue on your windows 10 Toshiba Satellite laptop. Several reasons can make this error happen. They are:
- Backdated drivers.
- The IPv6 network protocol prevents the Wi-Fi adapter.
- Wi-Fi adapter is not supported in Windows 10.
- Third-party software.
These are the reasons that are creating the Wi-Fi connectivity issue in your laptop. In the next section, we have provided the solution against the reason.
How to Solve the ‘Toshiba Satellite Wifi won’t Turn on Windows 10’ Issue
Before going for the methods, do some basic work and check whether the problem is solved or not. Look for the Wi-Fi key and press it with the Fn key. After that follow the on-screen command.
Another way to solve this issue, navigate into the Windows Settings and go to Network & Internet option. Adjust your laptop’s Wi-Fi settings.
If both the basic check failed then follow the methods below.
Method 1: Update Network Drivers
Backdated network driver can cause Wi-Fi issues. To avoid the circumstances, follow the steps below.
- Step 1: Press Windows Key and type Device Manager. Click on Device Manager.
- Step 2: After navigating into the device manager, find out the network driver.
- Step 3: Right-click on the driver and click on update driver. Also, you can uninstall the driver and download the latest version from the manufacturer’s website and install it.
If still the problem remains on your laptop, hop in into the Compatibility mode for the previous version of windows and install the driver there.
- Download the driver file and after downloading, right-click on the installation file and click on Properties.
- Next, click on the compatibility tab. Now, check the box of Run this program in compatibility mode.
- Now, click on the drop-down box and select a previous version of OS (Operating System) and click OK. Now, install the driver and check.
Method 2: Troubleshoot Network Adapter
By troubleshooting, your operating system will fix the issue by itself. You just need to start the process and rest on your couch. To do so,
- Step 1: Press Windows Key and type Control Panel and navigate into it.
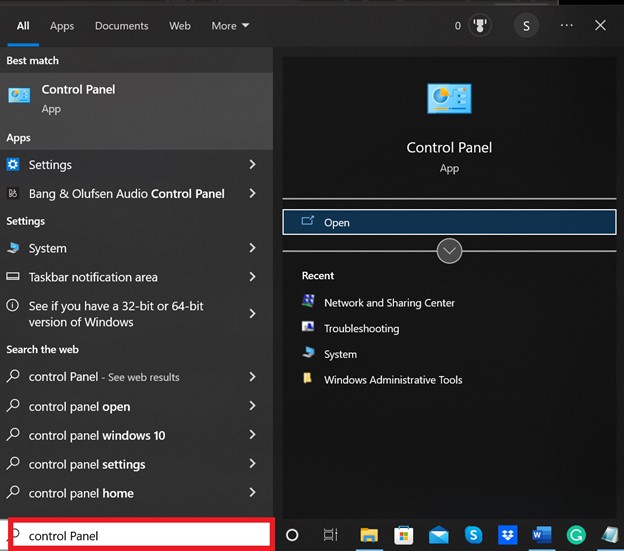
- Step 2: Next, click on the search bar and type Troubleshooting. Now, navigate into the Troubleshooting option and click on View All which is located on the left panel.


- Step 3: Now, click on Network Adapter and then Advanced. After that click on Run as Administrator and click Next.


Follow the on-screen instructions and solve your Wi-Fi issue.
Method 3: Turn Off IPv6 on Your Laptop
Turning off the IPv6 can solve this problem. Go through the following
- Step 1: Navigate into the control panel and open Network and Internet.

- Step 2: Next, navigate into Network and Sharing Center.

- Step 3: Now, click on Change Adapter Settings.

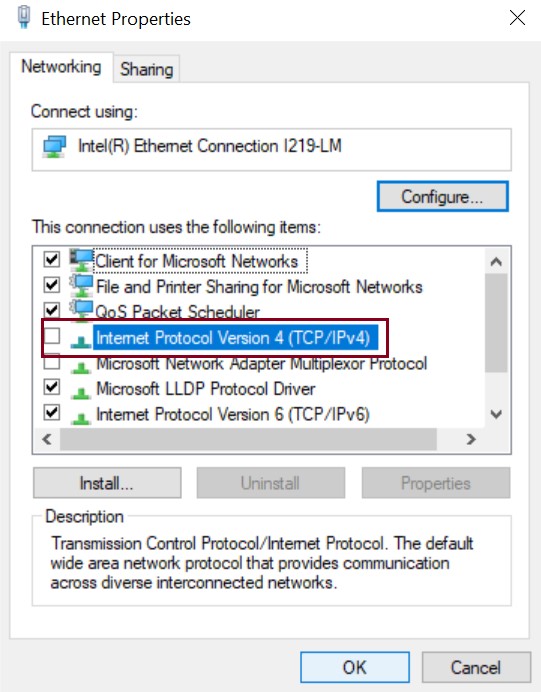
- Step 4: Next, right-click on Your Connection and navigate to Properties.

- Step 5: Uncheck the Internet Protocol Version 6 (TCP/IPv6) box and click on OK.
Method 4: Renew Your IP Address
Renewing your laptop’s IP address can solve this network error.
- Step 1: Press the Windows key and type cmd.
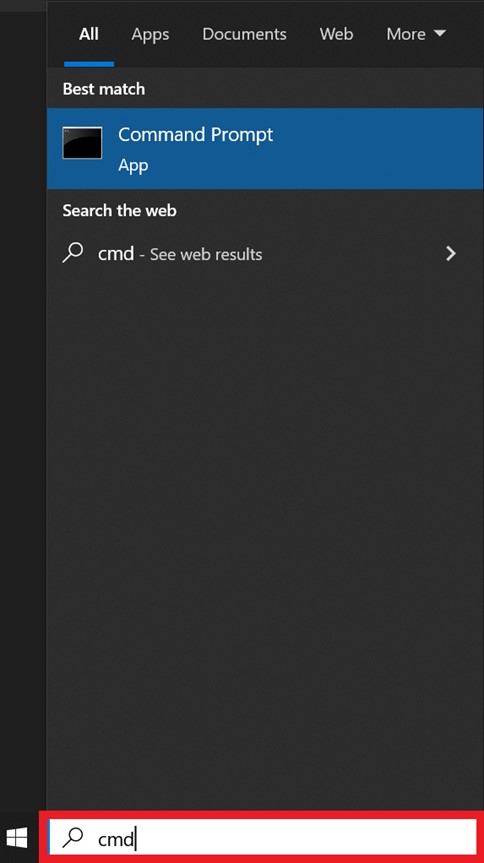
- Step 2: Run the Command Prompt as Administrator.
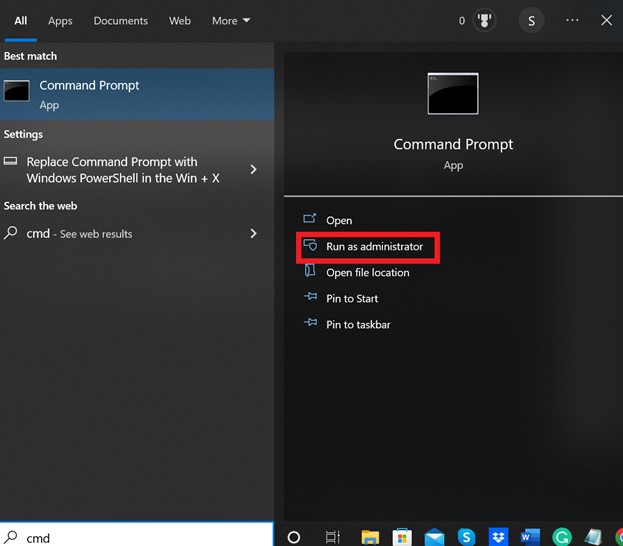
- Step 3: Now type ipconfig/release and press enter. Again, type ipconfig/renew and press enter.


Method 5: Turn on Wireless Service
Follow the following steps to turn on the wireless service on your laptop.
- Step 1: Open the Run dialog box by pressing Windows + R keys.
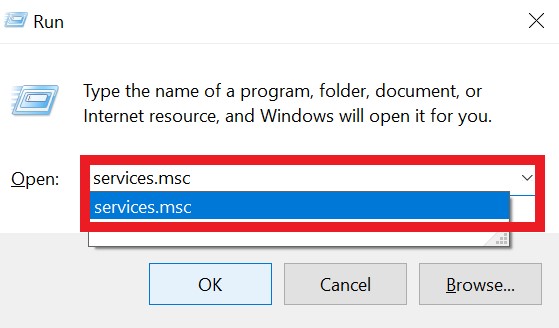
- Step 2: In the dialog box, type services.msc and hit Enter.
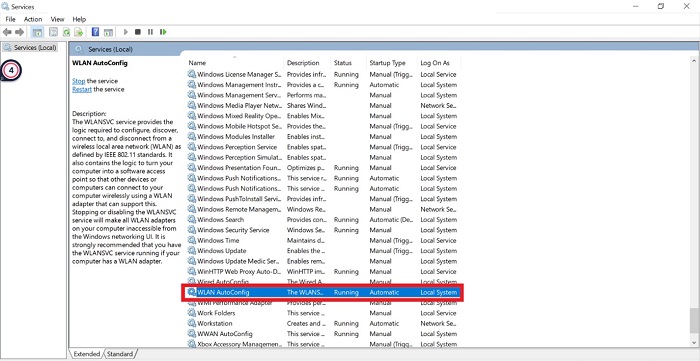
- Step 3: Find WLAN AutoConfig, Right-click on it and then click on Start.
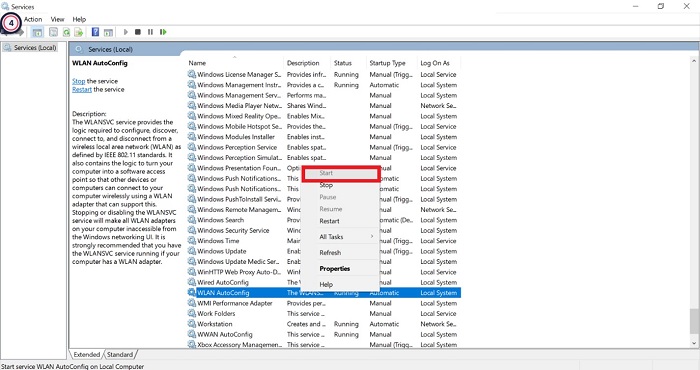
Now check whether the issue is solved or not.
Frequently Asked Questions (FAQs)
How do I turn on my Wi-Fi if my function key is not working?
If you do not have an Fn key on your keyboard then you can try the virtual keyboard. To turn it on, follow the sequence Settings > Ease of Access> Keyboard. Now, turn on the on-screen Keyboard option. Now, use the Fn key from there.
Why does my PC have no Wi-Fi option?
If you’re not seeing the Wi-Fi option on your laptop then it can happen due to card driver power settings. To change it, navigate into Device Manager and expand Network Adapter. There you’ll find the card driver power settings. Change it from there.
Conclusion
Usually restarting the router does the trick for most. if not, consider checking your firewall settings and attempting the fixes we’ve mentioned above. Remember to keep your drivers up to date. Thanks for reading.
Subscribe to our newsletter
& plug into
the world of technology
