NTFS DisableDeleteNotify = 0 | Everything You need to Know
NTFS DisableDeleteNotify = 0 (Disabled) means the TRIM support (also known as TRIM function or Trim Command) is enabled on your SSD with NTFS (New Technology File System). When it is enabled, the operating system automatically detects the unused sectors and deletes that block on SSDs. It simply increases the life and performance of SSDs.
While using the TRIM command, you may get a command line on your command prompt with the following message – “NTFS DisableDeleteNotify = 0”. After receiving these kinds of command lines, many computer users can’t understand what it means or what to do now.
If you are feeling the same, then we were riding the same horse. But don’t worry, we will explain from A to Z about “NTFS DisableDeleteNotify = 0” including what is TRIM function, how it works, how to check, enable or disable it, and much more in this guide.
So, stay tuned till the end of this article for a better understanding.
Some Basics About SSD TRIM Function
Before going any further or understanding “NTFS DisableDeleteNotify = 0”, you need to know some basic factors about SSD and TRIM functions. So, let’s start with what the SSD TRIM function is.
What Is the TRIM Function?
TRIM function is basically an ATA command for SSDs (Solid State Drives) with a SATA interface. This command allows the operating system to inform the SSD about which specific page of data needs to be deleted or ready to rewrite.
How Does SSD TRIM Function Work?
To understand how the TRIM function work, you need to know how the SSD works.
‘Page’ is the basic unit of SSD to read and write data and 128 pages together make a “data block”. When a command to delete some data on SSD is given by the operating system, SSD initially copies all the pages from a block and then deletes the entire block. Then it restores the all pages except the specific data back to the block.
TRIM command enables Windows OS to interact with SSD and allows SSD to delete the exact data page, not the entire block. As it reduces much storage management effort of SSDs, it gradually increases their lifespan and performance.
You can check this video below to understand the process more accurately:
What Is “NTFS DisableDeleteNotify = 0”?
There are 6 possible outcomes of queries using the TRIM functions to check whether TRIM is enabled or not and “NTFS DisableDeleteNotify = 0” is one of those outcomes. Here are the meanings of all those 6 possible results:
| Sl. N | Outcome | Meaning |
| 1. | NTFS DisableDeleteNotify = 0 (Disabled) | TRIM support enabled for SSDs with NTFS |
| 2. | NTFS DisableDeleteNotify = 1 (Enabled) | TRIM support disabled for SSDs with NTFS |
| 3. | NTFS DisableDeleteNotify is not currently set | TRIM will automatically be enabled if an SSD with NTFS is connected. |
| 4. | ReFS DisableDeleteNotify = 0 (Disabled) | TRIM support enabled for SSDs with ReFS |
| 5. | ReFS DisableDeleteNotify = 1 (Enabled) | TRIM support disabled for SSDs with ReFS |
| 6. | ReFS DisableDeleteNotify is not currently set | TRIM will automatically be enabled if an SSD with ReFS is connected. |
You can get one of these results while checking whether TRIM is enabled on your SSD or not. So, how can you check it? The answer is given below.
How to Check If TRIM Is Enabled
Now, let’s see how to check if TRIM is enabled or disabled. Here are the steps to follow:
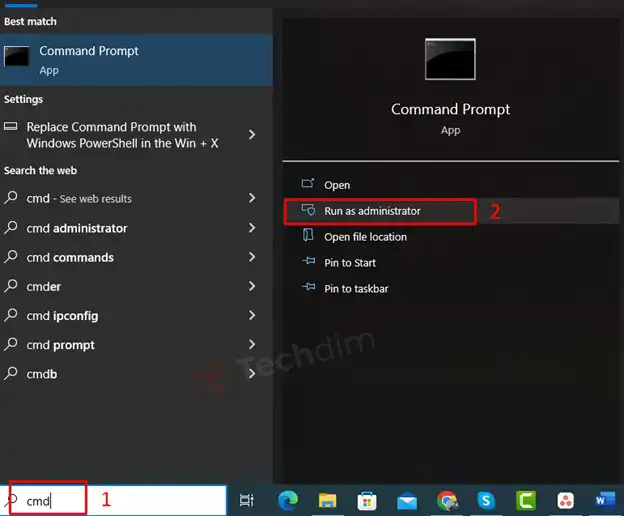
Step 1: On the Windows Search bar type cmd and click Run as Administrator.
Step 2: On the command prompt, type the following script and press Enter.
| fsutil behavior query DisableDeleteNotify |
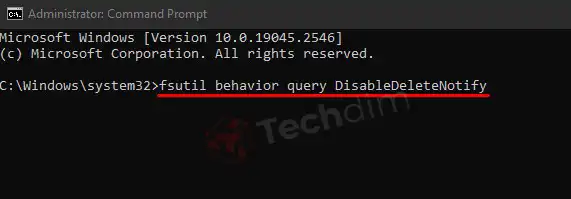
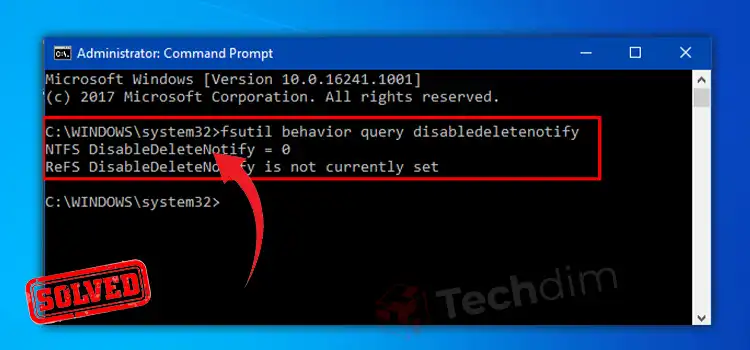
Here is a demo outcome for this query:
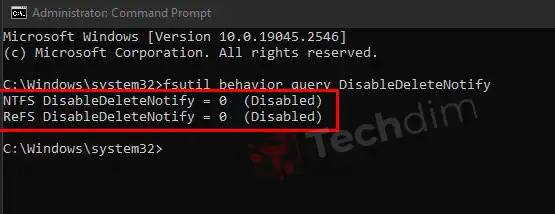
As you can see the results are –
- NTFS DisableDeleteNotify = 0 (Disabled)
- ReFS DisableDeleteNotify = 0 (Disabled)
It means the TRIM support is enabled for SSD with NTFS and ReFS.
How to Disable TRIM for SSD on Windows 10, 8,7
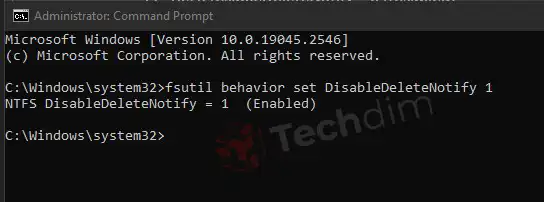
Now, if you get NTFS DisableDeleteNotify = 0 (Disabled), which means TRIM support is enabled for your SSD with NTFS and you want to disable the TRIM support, then you need to type the following command on the command prompt:
| fsutil behavior set DisableDeleteNotify 1 |
How to Enable TRIM for SSD on Windows
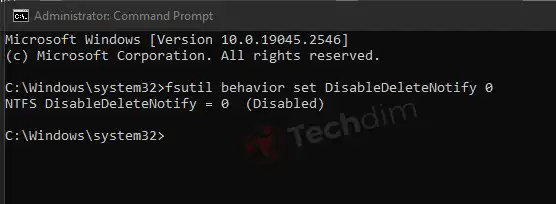
To enable TRIM support on your SSD, type the following command on the command prompt:
| fsutil behavior set DisableDeleteNotify 0 |
Our Verdict: Should You Enable TRIM or Not?
You already know the benefit of enabling TRIM. While TRIM support is enabled or it shows NTFS DisableDeleteNotify = 0 (Disabled), then SSDs don’t have to delete the entire block and restore it. As it deletes only the required page, it significantly increases the overall speed, lifespan, and performance of the SSD.
However, this feature has some drawbacks too. While TRIM is enabled, the deleted data from the SSD is unable to be recovered. If you store valuable data on your SSD, then we’d recommend you not to enable the TRIM function as you don’t have control over accidents and don’t want to lose your valuable data.
But if there is no important data on your SSD or you already have backups of those data, you obviously Enable TRIM on your SSD.
Frequently Asked Questions And Answers
Does HDD Need TRIM?
No, because the functions of HDDs aren’t the same as SSDs, and TRIM is designed for SSDs only. TRIM allows SSDs to delete specific cells and as HDD doesn’t have any cells, the Trim command won’t work for HDDs.
Does TRIM Permanently Delete Files?
Unfortunately, yes TRIM permanently deletes data and there is no recovery option for those deleted data.
Conclusion
You may already know that SSDs are way too faster than HDDs and that’s why it taking the place of HDDs. The TRIM function makes SSDs faster and NTFS DisableDeleteNotify = 0 simply means the TRIM function is enabled for SSDs with NTFS (New Technology File System). We have provided all the related information about this command and the TRIM function in this article and we hope you’ve found this guide helpful in understanding the mentioned command. If you have any queries regarding this topic, don’t hesitate to ask in our comment section below. Thanks for reading.
Subscribe to our newsletter
& plug into
the world of technology


