How to update Windows Defender Automatically and Manually | Simple ways
Are you concerned about your computer’s security matters? You have to be updated if you want to be secured in these days of increasing security attacks. Many users found it hard to update their Windows security guard of windows defender. But it’s not like that at all! In this article, I will show you how you can update your Windows Defender in different ways. Let’s go to work.
How to Update Windows Defender Automatically
You can update your windows defender automatically when the updates are available if you want. Now there are two cases
- You can make your computer’s settings such that all available windows updates will be installed automatically. If you do so, the windows defender will be automatically updated like other available windows update. And yopu don’t have to open the windows defender window for that.
- You can turn off your computer’s automatic windows update service settings tab, then windows defender won’t update itself anymore. But you can make windows defender to be updated automatically even though you are turning your computer’s automatic windows update settings off.
Now I will show you how to proceed with the above mentioned two processes.
Method-1: Update Windows Defender Automatically
Update Automatically along with all other windows platform version updates available –
For Windows 10 Users
If you are a Windows 10 user, then follow these procedures. Just follow these instructions carefully to get your things done properly. Let’s go.
- At first search settings in your computer’s search bar and click on the first result. Or, You can click on the start menu and then select the settings option.


If you want the updates of windows defender to be updated automatically, then select the option ‘Automatic’ or ‘ Install updates automatically’. But in this process, all updates of windows will be installed automatically like windows defender. This is irritating if you want windows defender only to be updated automatically.
You can choose the option ‘Check for updates but let me choose whether to download and install them’. If you choose this option, then you will be notified when any windows update is available. Just approve the updates of windows defender and ignore rest if you want windows defender only to be updated.
Windows Defender Protection Update For Windows 7/ 8
Follow the below procedure if you are a windows 7 or 8 users.
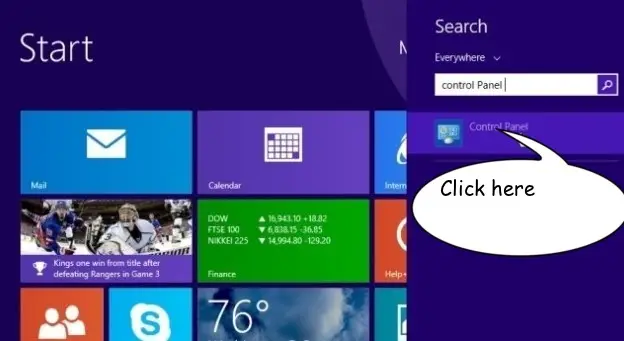
At first, you have to open the control panel. In windows 8, press (Windows+X) button or search control panel in yoursearch bar and then click on the first result.
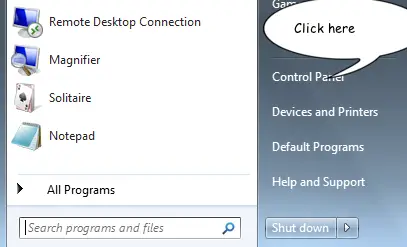
In windows 7, Click on the start menu and then choose the control panel.
Or, You can search the control panel in your search bar and then click on the first result.
Now go to System and Security→ Windows Update.
Click on the option ‘Change Setting’.
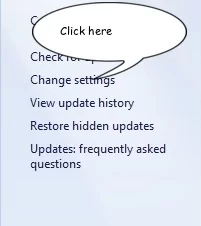
Now you will find several options. Choose any of these below two options but I prefer you the second one here.
Install updates automatically (recommended): If you want the updates of windows defender to be updated automatically, then select this option. But in this process, all updates of windows will be installed automatically like windows defender. If you want all updates to be installed automatically, then it’s okay. But if you don’t, then don’t select this option.
Check for updates but let me choose whether to download and install them: If you choose this option, then you will be notified when any windows update is available. Just approve the updates of windows defender and then windows defender will be updated. You can ignore the notifications of other windows updates if you want windows defender only to be updated.

Select your preferred option and then click Ok.
Method-2: Update Automatically when Windows Automatic Update is turned off
At first, you have to open the control panel. In windows 10, Press (Windows+R) to open the run prompt and then type control panel. Click Ok to open the control panel.
In Windows 7/8, search the control panel in your search bar and then click on the first result.
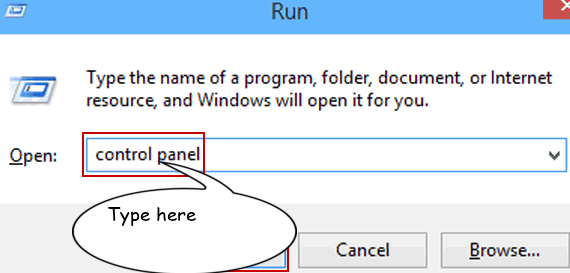
Now go to System and Security → Administrative Tools → Schedule tasks
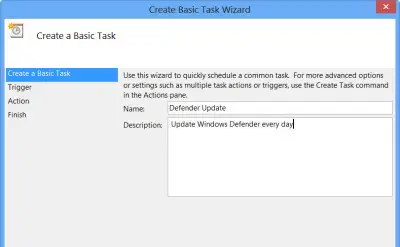
Now you will see the windows of Task Scheduler. Click on the option ‘Create Basic Task’ in the right panel.
Now you will see a window asking for Task name and description. This is not anything serious. Give a name and description regarding the windows defender. Click Next.
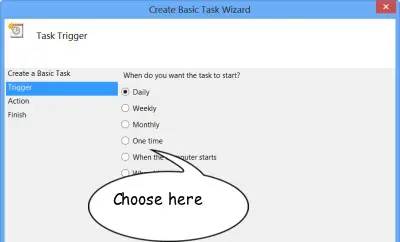
Now you have to set the frequency. It means whether you want to run the task daily or monthly or other options are available. I prefer to select a daily option. Click next.
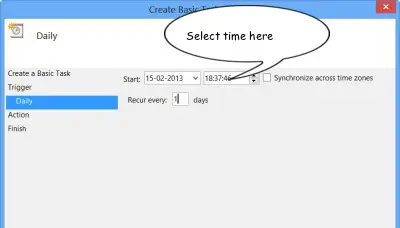
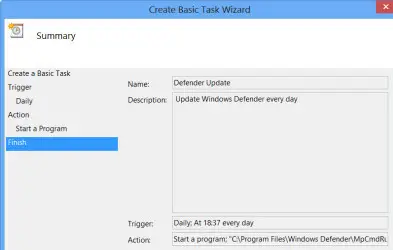
Now set the time you want to run the task. Click Next.
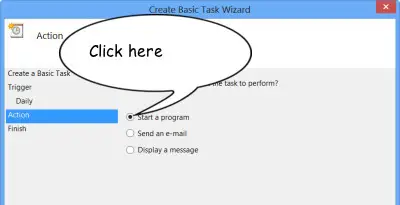
Select the option ‘Start a program’ and click Next.
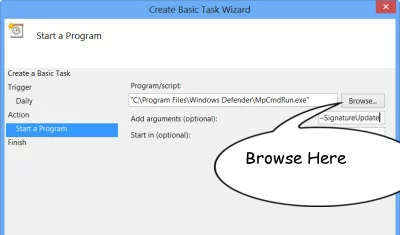
Now type the below path in the Program/script box.C:\Program Files\Windows Defender\MpCmdRun.exe Now type -SignatureUpdate in Add arguments box Click Finish.

When the task will search for a windows defender update, then a blank window will be appeared and closed down after a while. If you don’t want the window to appear, then just do this→type the below path in the Program/script box. C:\Program Files\Windows Defender\MSASCui.exe Now type -Update in Add arguments box. Click Finish. This time you won’t see a blank window while checking for updates.
You are done now. Your created task has been added to the task library. The task will run every day at your given time and search for windows defender update. If the update is available, then the update will be installed on your system.
If you want to run this task more than once a day, then continue with the below steps. If you don’t want, then simply skip the below steps.
Go to the task scheduler and go to the library in the right panel. You will find your created task. Open it. Click on it and open its properties box.
Click on the Trigger tab. Then select the task and click edit.
Now you find an option in the lower part named ‘Repeat Task Every’ and you can choose the option for 1 hour or 6 hours. If you select 1 hour then the task will check for windows defender updates every hour and for 6, hen the task will check for windows defender updates every six hours. Choose your preferred option. Click Ok and you are done. 
It will update Windows Defender based on the scheduled task.
How to update Windows Defender Manually
You have seen the process of how you can update windows defender automatically. Now I will show you how you can update windows defender manually. Let’s go to work on manually update windows defender antivirus to force windows defender update.
Method-1: Install Manually
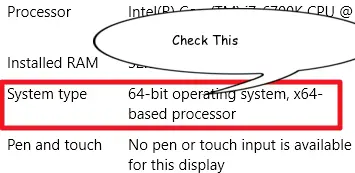
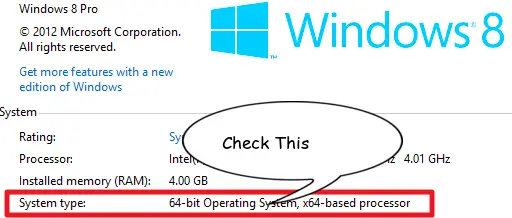
At first, you have to check your computer’s system type means you are a 32-bit version user or 64-bit version user. In windows 10, press the (windows+I) button. Now go to System→ About. Now you will find an option named System type. Check its information and you can see whether you are a 32-bit or 64-bit version user.
In windows 8, search System in your search bar and click on the first result. Check System type value information and you can see whether you are a 32-bit or 64-bit version.
In windows 7, click the Windows Start icon from the lower-left corner. Now right click on the computer option and then choose properties.
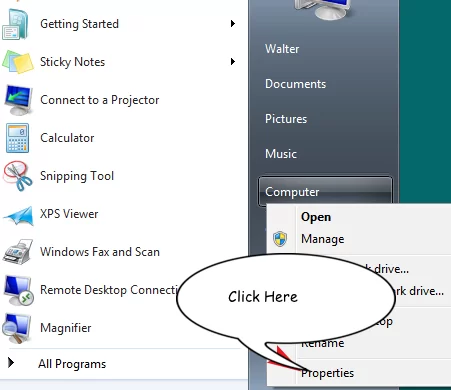
Check System type value information and you can see whether you are a 32-bit or 64-bit version user.
Now you have to download the .exe file of windows defender antivirus definition updates. Click on the below links likewise your system type to download the .exe file→ Click Here to download
After completing your download, double click on the .exe file, and windows defender will be updated. You are done, go sleep!
Are You Facing Trouble on window defender update?
If you are in trouble and cannot get your things done properly with this method, then you can run an offline scan with the windows defender offline tool first and then retry the windows defender manual update.
The method from the top then can help you to fix the problem. If you want to see how you can perform an offline scan with the windows defender offline tool, then click here.
Method-2: Update Windows Defender Manually Using Windows Powershell
At first, you have to open the windows PowerShell as admin mode. Search Windows PowerShell in your computer’s search bar and then right-click on the result ‘Windows PowerShell’ and choose ‘Run as administrator’.
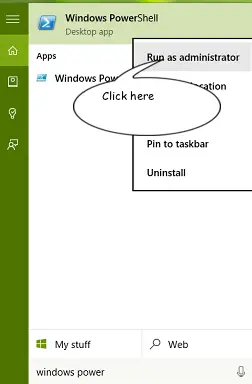
If your computer is password protected, then a window can appear asking for a password. If so, type your password there.
Now you will see the Windows PowerShell window. Now type cd and press enter. Again type cd and hit enter.
Now you can update windows defender two ways. You can tell the system the install source or just tell it to update from the best source available.
If you want to update windows defender from the best source available without giving any specific source, then type the below command and click enter.
Update-MpSignature

If you want to initialize the update source, then they’re available four sources you can use. If you want to download the update from InternalDefinitionUpdateServer, then type the below command and click enter.
Update-MpSignature -UpdateSource InternalDefinitionUpdateServer
If you want to download the update from Microsoft update server, then type the below command and click enter.
Update-MpSignature -UpdateSource Microsoft update server
If you want to download the update from Microsoft Malware Protection Center (MMPC), then type the below command and click enter.
Update-MpSignature -UpdateSource MMPC
If you want to download the update from FileShares, then type the below command and click enter.
Update-MpSignature -UpdateSource FileShares
Select your preferred source and after a while, you will be done with the windows defender latest update!
Conclusion
So, how to update windows defender antivirus in windows 10 and quick scan and protect your PC from malware attacks? Just follow the instructions properly to get your things done smoothly and perfectly us the Microsoft antimalware software. If you face any problem, just start from the top and check whether you miss anything. If you haven’t updated your windows defender yet, go update it now to prevent any major harm to your system.
- How to Update Windows Defender Automatically
- Method-2: Update Automatically when Windows Automatic Update is turned off
- How to update Windows Defender Manually
- Method-1: Install Manually
- Are You Facing Trouble on window defender update?
- Method-2: Update Windows Defender Manually Using Windows Powershell
- Update-MpSignature
- Conclusion
Subscribe to our newsletter
& plug into
the world of technology


Thanks bud
I set up #2
With the auto close window thing
Hope it works tomorrow morning
Microsoft!! Really makes things tricky!!
thanks
You’re most welcome. Did the method work?