How to Increase Frame Rate | Get Better Viewing Experience
Frame rate is the frequency rate at which the frames appear on the screen. The frame rate is measured per second. We use computers for various reasons including playing games. When you play games, there displays a fast sequence of images and it looks like playing a video. These fast-forwarding images are known as frames and the number of frames per unit second is called the frame rate. A video normally runs at 24fps. It means 24 images are taken in one second. But, while taking these images so fast of a moving object, the object may be a little blur and it slows down the moving speed into the next frame. You can check this article on how you can change the refresh rate of your monitor. In this article, we will try to give proper guidance on how you can Increase Frame Rate of a monitor.
There are some reasons behind the slow fps in your computer. If there are outdated drivers in your PC, it can slow down the frame rate. Old graphics cards, such as an old computer’s integrated graphics card or an old dedicated graphic card, and high-resolution programs can also cause a slow frame rate. The slow frame rate also happens when game settings turned up too high. There are some methods below to increase the frame rate of your device.

How to Increase Frame Rate
From here, we will discuss various methods regarding on how to increase Frame Rate and all the whereabouts of it.
Method 1: Updating Your Driver
Step 1: First, you have to open the Run window on your computer. You can simply type run in the search engine, or Cortana to find it or you can press Windows key+ R on your keyboard to open the Run window.

Step 2: Once the Run window opens. You have to type dxdiag in the command line and press Enter. You can also click on Ok.
Step 3: Now, a new window will appear on your screen. You have to select the Display tab at the top.

Step 4: Note the name and manufacturer of your card
You can update drivers manually easily. Or you can update drivers using third party applications.
Method 2: Adjust for Best Performance

Step 1: First, you have to Open Control Panel on your computer. For this, you have to go to the search engine and type the control panel there. Then, press Enter, and from the results, you have to select the best match for the search.
Step 2: Once you open the control panel, you have to go to.
Step 3: In the System window, you have to select the Advanced system settings. You will find the option in the left panel of the Window.
Step 4: A new window will appear. You have to select the Advanced tab. Then, you have to go to the Performance section and click on Settings there.
Step 5: Now, you have to check on Adjust for the best performance option.
Step 6: Then, you have to go to the Remote tab. You will find the tab in the System Properties. There, you have to make sure that the Allow Remote Assistance option is unchecked.
Step 7: Next, you have to go to the Power Options.
Step 8: Finally, you have to select the High Performance or the Ultimate Performance power plan and save the changes.
Method 3: Enable Game Mode

Step 1: First, you have to open the Settings Window. You have to click on the Start button and select Settings. To open the sync settings on your computer, check this article.
Step 2: Once, you are in the Settings panel, you have to click on Gaming.
Step 3: In this panel, you have to go to Game Mode
Step 4: Finally, you have to turn on the mood.
Method 4: Decrease Your Resolution

Step 1: First, you have to go to the Start button and click on it. You have to select the Control Panel from the menu.
Step 2: In the control Window, you have to go to the Appearance and Personalization. There, you have to click on the Adjust screen resolution.
Step 3: Now, you have to click the drop-down list. You will find it next to Resolution. Here, you have to move the slider of the resolution. You have to keep the resolution in a lower range.
Step 4: Next, you have to click Apply.
Step 5: Finally, you have to click on Keep to save the new resolution.
Method 5: Adjust the Monitor Refresh Rate
Step 1: First, you have to open the settings on your computer.
Step 2: Then, you have to go to the system and click on the Display.
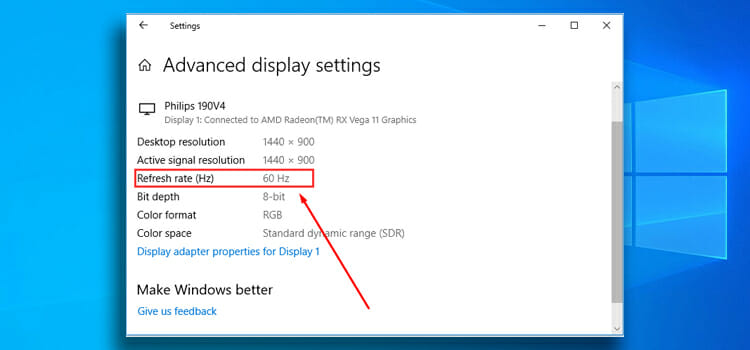
Step 3: Now, you have to click on the Advanced display settings link.

Step 4: Next, you have to click the Display adapter properties for the Display 1 link there.

Step 5: You have to click the Monitor tab at the top of the window.
Step 6: Then, you have to go to the Monitor Settings and change the refresh rate there. You have to change the value to the FPS of your system.

Step 7: After that, you have to click the Apply button.
Step 8: Finally, you have to click the OK button to save the changes and exit. If you are interested to buy a good quality monitor that produces a better refresh rate, then we suggest you buy a G sync monitor because it is more compatible with the newer graphics cards.
Method 6: Run a System Scan
Step 1: First, you have to go to the search engine and type cmd in the taskbar. From the search results, you have to select the Command Prompt.
Step 2: You have to right-click on the Command Prompt and select Run as administrator from the menu bar.
Step 3: When the command prompt appears. You have to type DISM.exe /Online /Cleanup-image /Restorehealth and then press Enter.
Step 4: Finally, you have to wait until the process is finished.
If There Is a Problem Executing the Operation, You Can Run Another Command in the Command-Line to Run the System Scan.
Step 1: You have to type SFC/ scan now in the command line and press Enter.
Step 2: Finally, you have to complete the process and restart your computer.
Install Razer Cortex

Step 1: First, you have to download Razer Cortex on your computer. To download it, you can simply go to http://www.razerzone.com/cortex/boost and you have to click Download now there.
Step 2: Then, you have to install the app on your computer. You have to allow make changes to the computer and sign in to an account.
Step 3: Now, you have to open the app and boost the gaming apps.
Method 8: Close Background Programs
Step 1: First, you have to open the task manager on your computer. You can type task manager in the search engine and press Enter. From the search results, you have to select the task manager.
Step 2: Then, once the task manager window appears, you have to click on the Processes tab. You have to close any process that you want to stop.

Step 3: Now, you have to go to the Control Panel of your computer.
Step 4: There, you have to select Uninstall a Program or Programs and Features option.
Step 5: Finally, you have to uninstall the apps which you don’t want to run or stop the apps that run on the background.
Method 9: Check Your Disk for Errors
Step 1: First, you have to open the Command Prompt on your computer. You have to type cmd in the search engine and press Enter. From the results, you have to choose the command prompt.
Step 2: You have to right-click on the command prompt and select Run as administrator from the menu bar.
Step 3: Once the command prompt, you have to type the chkdsk C: /f command in the command line and press Enter. Here, the letter C will be replaced with your hard drive partition.

Step 4: You have to run the chkdsk D: /f command to detect and repair logical issues of your drive. To repair physical issues, you have to run the /r parameter.

Conclusion
You can increase the frame rate of your device by following the above methods. You have to follow the steps properly to increase frame rate. We hope we were able to successfully give proper direction on creating the frame rate and we hope it will give a good experience during gaming.
Subscribe to our newsletter
& plug into
the world of technology


