How Do I Enable 3440×1440 Resolution? | 3 Methods to enable
Quad HD or QHD offers the sweet spot between enhanced clarity while not being too resource hungry as 4K. At 3440 X 1440, it is slightly larger than Full HD or 1920 X 1080. However, many users face a problem when they can’t set their resolution to 3440 X 1440. Sometimes, the resolution is not even shown in the display settings. In that situation, how do you enable 3440 X 1440 resolution?
Well, you need to make sure that the proper display driver is installed on your system. Also, check for HDMI compatibility in your device. Below, we’ve described those steps in detail.

How Do I Enable 3440 X 1440 Resolution
There are a few ways to manually set your display resolution to QHD if your computer can’t detect it on its own.
1. Use Windows Registry Editor
Here’s how to manually set your display resolution using the Windows registry editor to any values you want. You can use this method to enable 3440 X 1440 in both Windows 10 and 11, or even on earlier versions like Windows 7.
- Press the Windows key + R simultaneously to open the Run dialogue box. Now type “regedit” in the empty box, and press Enter.
- Navigate to the following path in the registry:

HKEY_LOCAL_MACHINE\SYSTEM\CurrentControlSet\Hardware Profiles\UnitedVideo\CONTROL\SERVICES\BASICDISPLAY
- Within this folder, locate the keys with the following names:
- DefaultSettings.YResolution
- DefaultSettings.XResolution
- Modify the values of these keys to 3440 X 1440 to enable QHD resolution. Then restart your computer.
2. Windows Registry Editor, 2nd Method
Many users don’t seem to find the UnitedVideo folder. For them, the solution can be a bit lengthy, but well worth the time, since it’ll fix your 3440 X 1440 resolution issues once and for all.
STEP 1 – Boot your Computer into Safe Mode
- Turn off your system.
- Start your computer and wait for it to turn on. As soon as it turns on, press and hold the power key for 3-4 seconds to force shut down your device.
- Press the power button to switch on your computer again.
- Don’t interrupt the normal booting process this time.
- When the Automatic Repair window appears, click on “Advanced options”.
- In the “Choose an option” window, click on “Troubleshoot”.
- In the Troubleshoot window, click on “Advanced options”.
- Then, click on “Startup Settings”.
- Click on “Restart” to reboot your computer in Safe Mode.
- When the special startup options appear, press the “4” key to enable Safe Mode.
Once you’ve booted up to Safe Mode, proceed with the next step.
STEP 2 – Modify resolution using the Registry Editor
Now you need to fiddle with the registry settings.
If you can’t find the UnitedVideo folder, it’s in one of the locations below.
\HKEY_LOCAL_MACHINE\SYSTEM\ControlSet001\Control\UnitedVideo\CONTROL\VIDEO\{3B042451-A9C3-11E9-90BF-CDAACD7E7FBF}\0000”
b) “
\HKEY_LOCAL_MACHINE\SYSTEM\ControlSet001\Control\UnitedVideo\SERVICES\BASICDISPLAY”.
c)”
\HKEY_LOCAL_MACHINE\SYSTEM\CurrentControlSet\Control\UnitedVideo\CONTROL\VIDEO\{3B042451-A9C3-11E9-90BF-CDAACD7E7FBF}\0000″
d)”
\HKEY_LOCAL_MACHINE\SYSTEM\CurrentControlSet\Control\UnitedVideo\SERVICES\BASICDISPLAY”
- Press the Windows key + R to open the Run window.
- Type “regedit” and press Enter.
- In the Registry Editor window, click on “HKEY_LOCAL_MACHINE”.
- Click on “Edit” in the menu bar and select “Find”.

- In the “Find what” box, type “DefaultResolution.yResolution” (the key name).
- Click on “Find Next”.
- On the right-hand side, double-click the “DefaultSettings.VRefresh” key.
- Select “Decimal”.
- Set the ‘Value data’ to “60” and click “OK”.
- Double-click the “DefaultSettings.XResolution” key.
- Select “Decimal”.
- Set the ‘Value data’ to “800” and click “OK”.
- Double-click the “DefaultSettings.YResolution” key.
- Select “Decimal”.
- Set the ‘Value data’ to “600” and click “OK”.
Repeat the above steps for each key mentioned (a, b, c, and d) in the Registry Editor.
- After modifying the keys, close the Registry Editor.
- Shut down your computer and start it again.
STEP 3 – Adjust the resolution manually
This is the final step. After you restart, your computer will boot into 800×600 resolution, you need to change it back to the highest resolution supported by your screen.
- Press the Windows key + I to open Settings.
- In the Settings window, click on “System”.
- On the left-hand side, click on “Display” settings.
- Scroll down on the right-hand side and under “Display resolution”, click on the drop-down menu.
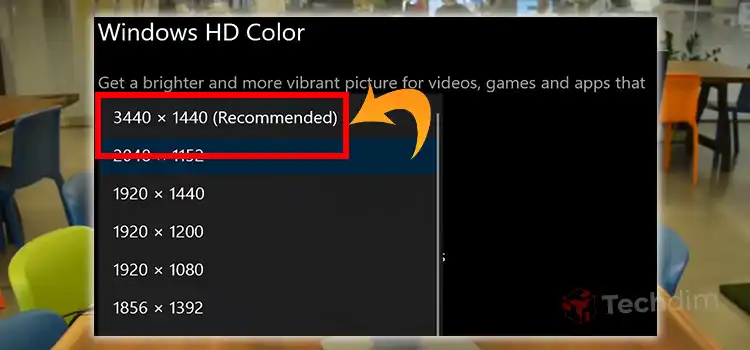
- Select the resolution that has “Recommended” next to it from the available options.
In your case, the highest resolution should be 3440 X 1440. Select it. Your issue should now resolve completely.
3. Check Your HDMI
It doesn’t matter what is the maximum resolution supported by your GPU, if you don’t see HDMI 2.0 supported on the specs, you won’t be able to set QHD resolution on your system. HDMI below 2.0, for example, 1.4, supports resolution only up to 2560 X 1440 pixels.
So, if you are using an older system, especially an old laptop, chances are that your device doesn’t support HDMI 2.0, and therefore, you cannot set the display resolution to QHD.
The only possible solution is to use an alternative display port like USB-C, Mini Display Port or a regular display port like VGA.
Enable Method for Mac User
In the case of Mac, it’s rather simple. Just go to System Preferences and click on Displays.

Set the resolution to Default for Display, then click on Scaled. Now select the 3440 X1440 option.
Frequently Asked Questions and Answers
Does HDMI support 3440×1440?
HDMI 2.0 provides a peak data transfer rate of 18 Gbps. This translates to a maximum resolution of 3840×2160 at 60Hz when HDR is enabled. Depending on your GPU, it can go even higher.
How do I get an ultrawide resolution?
Navigate to Windows Settings > System > Display. Choose the desired monitor and access the Display resolution. If the resolution you are looking for is unavailable, go to Advanced display settings. Make sure that the monitor is selected under Choose Display, then click Display adapter properties for Display.
Why can’t I increase my screen resolution?
Make sure that you are running the latest display drivers and try again.
Final Thoughts
When you can’t set your display resolution to 3440×1440, first check for any updates in display drivers. Try to adjust the resolution manually after performing the update, followed by a restart. If it still won’t budge, proceed with editing your Windows registry. It’s a bit time-consuming process, but well worth your time.
Subscribe to our newsletter
& plug into
the world of technology


