[Fix] Rosetta Stone Not Detecting Mounted ISO (100% Working)
Rosetta Stone is a popular computer-assisted language learning software around the world. Due to being an expensive software, you may be using a digital backup of this software in a form of an ISO file.
The first thing you need to do for installing that ISO file is to mount that ISO on your computer. However, many users are facing an issue with their computers that the mounted ISO of the Rosetta Stone software is not detected by the operating system.
If you are facing the same, then you have come to the accurate place where you are going to get the actual solution to this issue.
Let’s not waste any more valuable time and read by the end of this article to get the solution.
How to Fix Rosetta Stone Not Detecting Mounted ISO?
You can fix Rosetta Stone not detecting mounted ISO by not unmounting the ISO after the installation and while running the application. Follow the methods below to make it work properly.
1. Mount Rosetta Stone ISO Without Any Tools
You need to follow the steps below carefully to fix the issue with the Rosetta Stone ISO file that isn’t detecting
Step 1: Most of the users facing the above-mentioned problem due to corrupted ISO files. So first, you need to Download the ISO file of Rosetta Stone software from a trustable site.
Step 2: Now, right-click the notification icon from the lower-right corner of your taskbar.
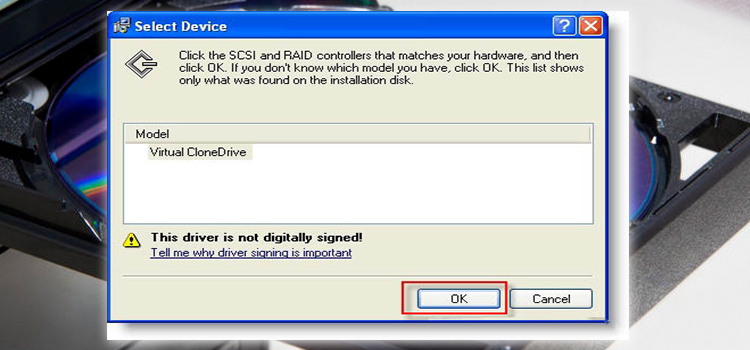
Step 3: Click on the “Virtual Devices” and then click “Mount“. After that, you will be taken to a new window where you have to click on the Rosetta Stone ISO file and click “OK” to load the ISO file on the computer as a virtual drive.
Step 4: Open the virtual drive and double-click the .exe file to install the software. Once the Rosetta Stone software is installed, reboot your computer.
Step 5: When your computer turns on, re-mount the ISO file as instructed above and run the Rosetta Stone software. This time you will not get the error saying that the Rosetta Stone is Not Detecting Mounted ISO.
If you are having trouble mounting the ISO file on your computer, then follow the next method below.
2. Mount Rosetta Stone ISO Using Tools
It happens for many users that the ISO file can’t be mounted without any tools. In this case, follow the steps below to mount Rosetta Stone ISO using tools:
Step 1: Download the ISO or Disk image file of Rosetta Stone as instructed in the above section.
Step 2: Download ISO or Disk Image File Installation software. You can download the free MagicISO or Daemon tools as both are most popular among users.
Step 3: Install the MagicISO or Demon tool and using that tool mount the Rosetta Stone ISO file.
Step 4: Install the software as instructed in the previous section from that ISO.
Bonus Tip: Alternative Way to Install Rosetta Stone
For many users, the Rosetta Stone Not Detecting Mounted ISO error appears if there is any fault with the installation process or the fault with the operating system. One of my friends faced the same issue and he fixed it in the way below:
He ran the Rosetta Stone V3 on multiple operating systems including – 32-bit and 64-bit Windows 7, 32-bit Windows 8, and 32-bit Windows 10. He faced no issue with these operating systems except the 64-bit Windows 7.
It means that you will face problems if you run the Rosetta Stone on a 64-bit operating system. However, you can fix it by doing a simple trick.
If you have the Rosetta Stone software installed on an old Windows XP, then go to the following path – c:\program data\rosetta, copy all data to a pen drive, connect the pen drive to the computer that has 64-bit OS and paste the data to the same path.
It may take time to copy as there are over 100000 files contained on the installed path of Rosetta Stone. So, you need to be patient in this process. Restart after finishing the process and the software will work perfectly without showing any error.
Frequently Asked Questions
How Do I Mount an ISO on Rosetta Stone?
To mount the ISO file on your computer, you need to go to the folder where you have downloaded the .zip or .rar file and extract it. Once you have extracted the file, right-click on the ISO file and select “Mount”. Finally, close the window and go to “File Explorer > This PC” and there you will find the virtual drive named after that ISO file.
How Do I Mount an RSD File to Rosetta Stone?
You can add the RSD file to the Rosetta Stone only after the application is installed on your computer. For that, first, you need to download the RSD file, then open the Rosetta Stone application and mount the RSD file by clicking the add button.
How Do I Use Virtual Mount ISO?
Mounting a Virtual ISO file on a computer is quite an easy process. You simply need to right-click on the ISO file and the shell context menu will appear near that file. At the top of that context menu, you need to select “Mount” and the ISO file will be mounted as a new virtual drive on your computer.
How Do I Manually Install Rosetta Stone Language Packs?
Once you have successfully installed the Rosetta Stone software on your computer, you need to run the application. When you run the application, a window will appear on your screen where you will be asked to select an interface language. Click on “Choose your preferred language” and select your preferred language. After that, the installation process will start and the language pack will be installed on your Rosetta Stone software.
How Do I Mount Rosetta Stone ISO File without Daemon Tools?
You can mount the Rosetta Stone ISO file simply by right-clicking on that file and selecting “Mount”. You don’t need any tool in this case. If this process doesn’t work for you then you can try the Daemon tool. However, if you don’t want to use this tool then there are many other similar tools to Daemon such as Virtual CloneDrive, MagicISO, ImgBurn, PowerISO, and CDBurnerXP.
Conclusion
Installing and running the Rosetta Stone software from a CD drive is quite simple. But many users face issues with this software that is installed from an ISO file. But due to being expensive, all users can’t afford this software and faces Rosetta Stone Not Detecting Mounted ISO error with their computer. Fortunately, we have provided the most effective ways to fix this issue in this article and we are hopeful that you can fix the error by following our given solutions. If you still getting the same error, then try downloading the older version of this software as an ISO file and repeat the same process as instructed above.
Subscribe to our newsletter
& plug into
the world of technology
