[Fixed] Overwatch Settings Not Saving (100% Working)
Are you stuck at the ‘Overwatch settings not saving’ issue?
I assume that your answer is ‘yes’. Relatively, you have come to the right place indeed. So, don’t worry.
After exploring the article, you will run the Overwatch game without facing the issue.

How to Fix Overwatch Settings Not Saving Issue
The issue you face is solvable. You can solve it by yourself. I will compile a couple of fixes here to assist you. Before jumping into the details, have a glimpse on the list first.
- Fix 1: Delete, Recreate and Customize Folder
- Fix 2: Remove Windows Defender Restriction
- Fix 3: Reinstall the Overwatch
Fix 1: Delete, Recreate and Customize Folder
You can fix the issue by deleting the game file. Then it is needed to recreate the new one and customize the related folder. You can follow the below steps to apply the fix.
Step 1
Firstly, you need to delete the Overwatch folder from ‘My Documents’.
Step 2
After that, you have to launch the Overwatch through the application as an admin. In this step, you should avoid the launcher to start the game.
Step 3
Accordingly, a new folder of Overwatch will create. You need to navigate the ‘Properties’ of the folder wherever you have to untick the ‘Read Only’ option.
Step 4
Again, you need to launch the Overwatch application as an admin. Then save all settings’ changes.
Hopefully, the issue will be over. But, if it still exists, you need to follow the next fix.
Fix 2: Remove Windows Defender Restriction
In many cases, restriction of Windows Defender is the possible reason. In that case, you can solve it by removing the restriction. To do so, you can follow the below steps.
Step 1
Firstly, press the Windows and ‘I’ keys together. Accordingly, you will get the ‘Settings’ window access. Then you need to select the ‘Update & Security’ section.

Step 2
After that, you have to choose the ‘Windows Security’ portion from the left side menu.

Step 3
Then look at the right side pane. Here you will see the ‘Virus & threat protection’ option under the ‘Protection areas’. You have to click on it.

Step 4
Consequently, a separate ‘Windows Security’ window will appear. You need to scroll down to find out the ‘Ransomware protection’ section. Under this, you will get a blue-colored ‘Manage ransomware protection’ option. You have to select it.

Step 5
Next, you need to trace the ‘Allow an app through Controlled folder access’ option. You will find it just under the ‘Controlled folder access’.

Step 6
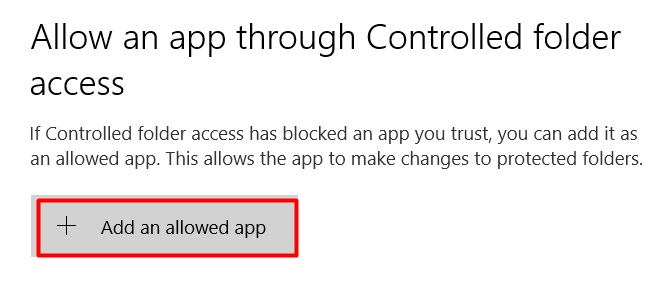
Then you need to allow the ‘User Account Access’. After that, the ‘Allow an app through Controlled folder access’ section will appear. Here you will see the ‘Add an allowed app’ tab. You have to tap it and select the Overwatch app to remove the Windows Defender restriction.

Finally, check the issue. Will it exist or not? If it exists, you have to follow the last fix.
Fix 3: Reinstall the Overwatch
When no other fixes resolve the issue, you have to reinstall the Overwatch. To do so, you need to uninstall the existing one first. Then install the game again. You can follow the below steps to apply the fix.
Step 1
Tap the Widows and ‘R’ keys together. As a result, the ‘Run’ will become evident. Then you need to type appwiz.cpl into the ‘Open’ bar and tap the ‘Ok’ tab at the end.

Step 2
Consequently, the ‘Programs and Features’ window will appear with the ‘Uninstall or change a program’ option. You have to find out the ‘Overwatch’ from the installed programs and features list.
While finding it, you have to right-click and select the appeared ‘Uninstall’ option. Accordingly, the game will be uninstalled from your PC.

Step 3
Next, you have to install the game from the existing application file with the buying key.
Finally, launch and play Overwatch without facing any error message.
Final Words
In the end, I hope that you will get rid of the ‘Overwatch settings not saving’ issue after exploring the article.
Subscribe to our newsletter
& plug into
the world of technology


