How to Copy Excel Sheet Into Word With Gridlines
If you have ever copied any data from an Excel sheet to Word documents, you might have noticed that the newly-pasted data doesn’t have the gridlines.
This begs the question, of how to copy Excel sheet into Word with gridlines. The answer is, you have to use the paste special option.
Continue reading below to find out more.
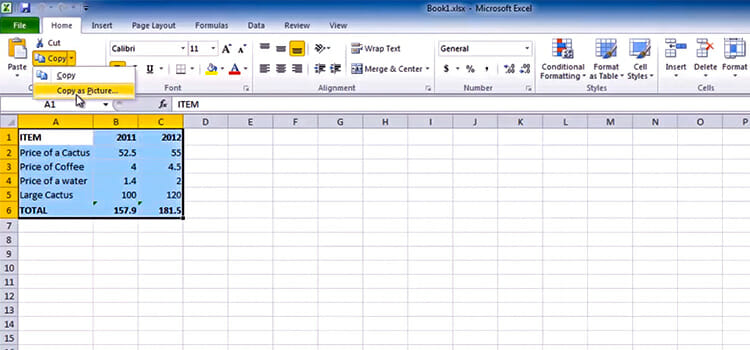
How to copy excel sheet into word with gridlines
Method 1: Copy-Paste Method
Let’s begin with the first procedure, which consists of just copy-pasting data from Excel to Word. You can choose to include only a portion of the Excel sheet in the Word doc when you choose this method.
Step 1: First, make a selection in your Excel sheet of the region you need to use in your Word document, and then press Ctrl + C on your keyboard to copy the data of the selection.

Step 2: Enter your Word document and press Ctrl + V there to paste the data of the text box into the Word document. To link, go to the bottom right and select either Match Destination Table Style and Link to Excel or Keep Source Formatting and Link to Excel from the Paste Options menu.
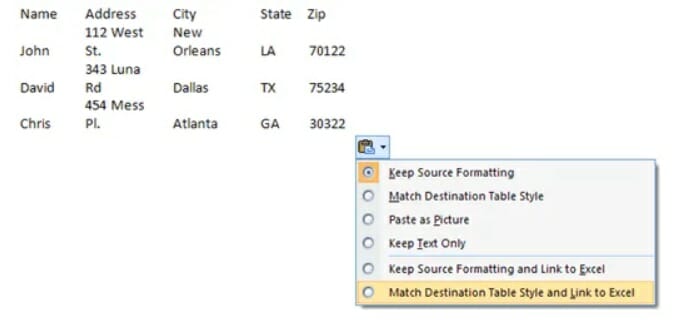
There are various icons in the latest version of Word. If you hover your mouse over them, you’ll get exactly two options as before.

Step 3: your data will now be linked to the source Excel sheet. If you change the Excel file and then reopen Word, it will prompt you to update the document with the updated information from the linked documents.

Step 4: Click on Yes, then, your table will update to reflect the updated values. You can observe the changes in real-time if you open both files at a time.

Method 2: Insert Object Method
The second method of connecting an Excel file to Word is to use the Insert menu option.
Step 1: First, you have to go to the Word, and click on the Insert tab. Then, you have to click on the Object and select Object from the dropdown.

Step 2: Select the Create from File option and then click on Browse to locate and select the file.

Step 3: Once you’ve selected the file, you’ll notice two checkboxes on the right-hand side. When you want to connect the Excel sheet to the website, you must select the option Link to file.
Alternatively, if you’d like to enter the sheet without linking it to the original file, you should leave the box checked.

Following the same method as before, utilizing the Insert Object technique will import all content from the Excel sheet into Word, instead of just a part of it.
You just open the original Excel file in the Excel itself when you double-click on the Excel object (if it is linked).
Finally, go to the Tabs Insert and select Tables. Then, simply click on the Excel spreadsheet below, you can add a customized Excel table in Word.

This method is just effective when you want to start from fresh with a new Excel sheet and make modifications to it from inside Word. What is amazing about this solution is that it inserts a floating sheet and loads the whole Excel menu in Word, allowing you to write formulae and other features just like you would in Excel.
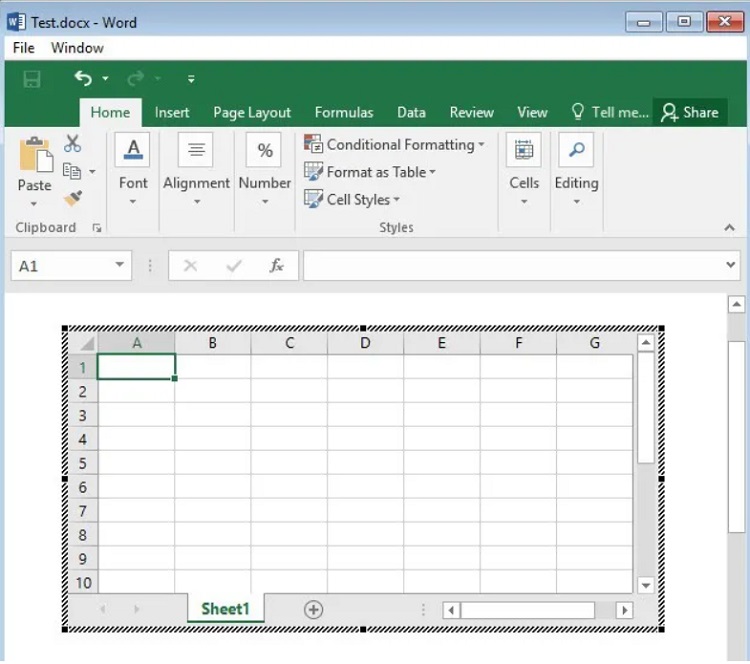
You can insert sheets, make filters, style cells, and do anything else that Excel allows you to do. This is a simple and effective way to put data into a Word doc which you can properly format with Excel rather than depending on Word tables, which are notoriously difficult to make appear decent.
Inside an Excel spreadsheet, you have to remove the Print box under the Gridlines throughout the Sheet section of the formatting tab of the ribbon.
- You have to copy a portion of the sheet to the clipboard.
- Then, you have to paste the content into your Word file as an Excel sheet Object. You have to simply click on the “Paste Special” option.
- Now, you have to select either the “Paste” or “Paste link” button there. You will find them in the dialog box of the “Paste Special” option.
- Next, you have to save all the changes and exit the document.
- You have to reopen the word document.
- Once you print the word document or the presentation, the gridlines are included in the document or presentation.
- In addition, the gridlines will be present in the print preview, as you can see in the screenshot.
Method 3: Import Excel Data into a Word Table
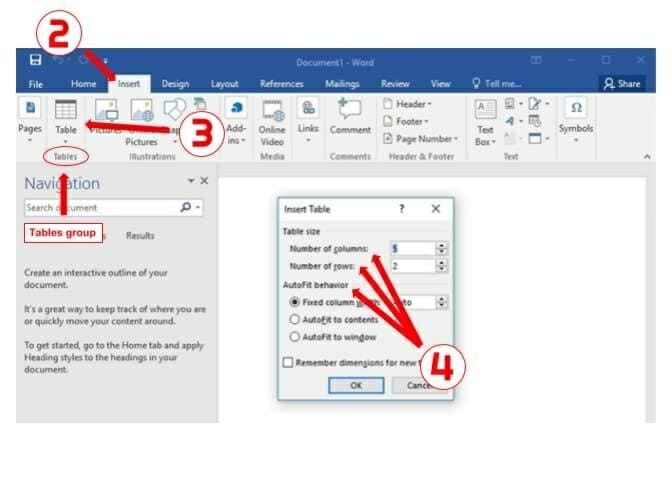
If you want to import data from your Excel sheet into your MS Word table., then follow the steps below:
Step 1: In Microsoft Word, create a new document or open an existing one.
Step 2: Then, you have to click on the “Insert” tab. This option is located in the “Tables” group.
Step 3: Now, you have to click on the “Table” icon. There, you have to select the “Insert Table…” option.
Step 4: Change the “Number of columns,” “Number of rows,” and “AutoFit behavior” to the values that you want to see in the table. Then, click on Ok.
Step 5: Enter your Excel file and you have to select the data which you want to import thereby using the mouse.
Step 6: Copy the range of cells that you have marked by selecting “Copy” from the context menu.
Step 7: Return to Word and select the table cells into which you want to insert the Excel data from the previous step.
Step 8: Finally, you have to right-click on your Word table and click on any option that you want to apply under the “Paste Options.”
Conclusion
Make sure to follow the steps properly, to ensure that gridlines are copied correctly. We this helped. Thanks for reading. And for any further queries, please leave a comment.
Subscribe to our newsletter
& plug into
the world of technology


