How to Connect a 4-Pin Fan to a Power Supply | Easy to Connect
If you’re looking to enhance the cooling performance of your PC or want to customize your system’s airflow, connecting a 4-pin fan to your power supply can be a great solution.
Earlier, PC fans were so simple to connect: Plug and play. Now, with 4-pin fans, there’s more to consider. These fans, also known as PWM fans, are a little different from their 3-pin predecessors.
While they promise better control and efficiency, they also come with their own set of challenges. But don’t worry. We’re here to guide you through the cooling breeze of connecting a 4-pin fan to your power supply.

Overview of 4-Pin Fans and Its Wires
Before we can tell you how to connect, you have to know about 4-Pin Fans and its wires. 4-pin fans, often referred to as PWM fans, are advanced cooling solutions commonly used in modern PCs. Unlike their 3-pin counterparts, they offer more precise control over fan speed and provide quieter operation.
The Components of a 4-Pin Fan A standard 4-pin fan consists of four wires: black (ground), yellow (12V), green (PWM signal), and blue (tachometer signal). Understanding the functions of these wires is crucial for successful installation.
Types of Power Supply Connections
When it comes to connecting your 4-pin fan to a power supply, you have two primary options:
- Molex Connectors: Molex connectors are the older and simpler method. They offer a direct connection to the power supply. However, they don’t allow for speed control, and fans connected this way will run at full speed.
- Motherboard Headers: Connecting your 4-pin fan to a motherboard header is a more versatile approach. It allows for PWM control, meaning the fan’s speed can be adjusted according to your system’s temperature. This method is ideal for those who prioritize quieter operations.
Step-by-Step Guide to Connecting a 4-Pin Fan
Method 1: Using Molex Connectors

Connecting a 4-pin fan using Molex connectors might seem a bit tricky at first glance, but with the right approach and careful attention, it’s a straightforward process. Here’s a step-by-step guide:
Precautions:
- Safety First: Before anything else, make sure your computer is turned off and unplugged from the power source. This ensures there’s no risk of electrical shock during the process.
- Identify the Connectors: Familiarize yourself with the Molex connector’s appearance. It’s a larger plastic connector, often white, with four pins inside.
- Locate the 4-Pin Fan Connector: This is usually a smaller connector and comes directly from the fan. It’s built to plug into a fan header on the motherboard.
Connecting the Fan to the Molex:
Step 1: If your fan doesn’t come with a Molex connector attached, you’ll need an adapter. This will have a 4-pin connection on one side and a Molex connection on the other.
Step 2: Attach the 4-pin connector from the fan to the 4-pin side of the adapter. Ensure it’s snug and secure.
Step 3: Next, connect the Molex side of the adapter to a free Molex connector coming from the power supply.
Step 4: Make sure wires aren’t hanging loose where they can get caught in other components or obstruct airflow. Use zip ties or twist ties to secure any slack.
Once everything’s connected, plug in and turn on your computer. Verify that the fan is running smoothly. If it isn’t, double-check your connections.
By following these steps, you’ll be able to effectively utilize Molex connectors to power your 4-pin fans. It’s a convenient method, especially when you’re out of available fan headers on the motherboard.
Method 2: Using a Fan Controller or Hub

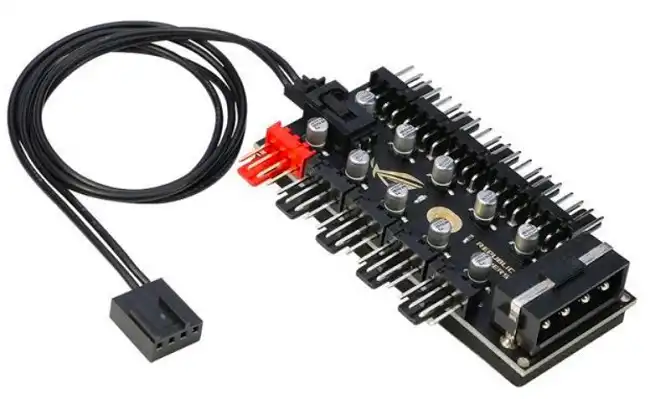
You can purchase a fan controller or hub, which is a dedicated device for connecting and controlling multiple fans. Some come with Molex connectors, while others are powered by SATA connectors. Here are the steps to follow:
Step 1: Plug your 4-pin fan into one of the available fan ports on the controller or hub.
Step 2: Depending on the model, you’ll either connect it to a Molex or SATA power connector from your PSU.
Some fan controllers allow you to adjust fan speed manually, while others may have automatic temperature-based control. Follow the specific instructions for your controller.
Safety Tips and Precautions
- Always power off and unplug your PC before making any connections.
- Be gentle when connecting or disconnecting fans to avoid damaging pins.
- Double-check connections to prevent overheating due to fan failure.
Short Questions and Answers
Q1: Can I connect a 4-pin fan to a 3-pin header on my motherboard?
Yes, you can. However, the fan will run at full speed, and you won’t have PWM control over its speed.
Q2: Are there any advantages to using a 4-pin fan over a 3-pin fan?
Yes, 4-pin fans offer more precise speed control and quieter operation compared to 3-pin fans.
Q3: Can I daisy-chain multiple 4-pin fans together?
Yes, you can daisy-chain multiple fans together using PWM splitters, allowing you to control them collectively.
Q4: Will connecting a 4-pin fan to a Molex connector damage it?
No, it won’t damage the fan. However, it will run at full speed constantly.
Q5: How can I check if my motherboard supports PWM control for fans?
Refer to your motherboard’s manual or visit the manufacturer’s website to confirm PWM support for specific fan headers.
Wrap Up
Connecting a 4-pin fan to a power supply or motherboard header is a straightforward process, offering you control over your system’s cooling and noise levels. Whether you opt for the simplicity of Molex connectors or the versatility of motherboard headers, this guide has you covered. Do you have more questions or facing issues? Feel free to drop your queries in the comments below, and we’ll be happy to assist you on your journey to a cooler PC.
Subscribe to our newsletter
& plug into
the world of technology


