How to Clear In and Out Points in Premiere? Step-by-Step Methods
During editing a video, a video editor often needs to set a “Mark In” and “Mark Out”. Most video editors set it using the shortcut keys (“I” for “Mark In” & “O” for “Mark Out”) and then as they don’t know the shortcut key to clear “In” and “Out”, they fall into big trouble.
If you are also unable to clear marks in and out in Adobe Premiere, then don’t worry, we are here to help you on clearing it. You can clear “In and Out” by simply pressing the “Option/Alt + X” button.
However, there are some alternative ways to clear in and out points in premiere if the shortcut keys don’t work. So, let’s read this article by the end to know in detail.

How to Clear In and Out Points in Premiere – Follow the Guideline
There are more than one ways to clear In and Out points in Adobe Premiere. You can apply any of the methods below to do it. If one method doesn’t work for you, then you can try another and by the end of this article, you surely able to clear all the marks in the premiere.
Method 1: Clear In and Out Points in Premiere From Menu Bar
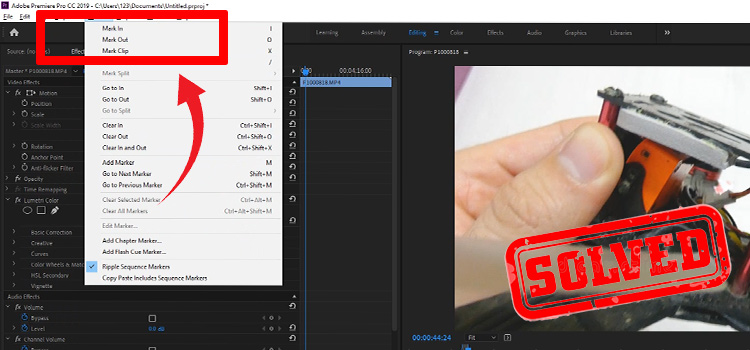
You can add and clear the “Mark In and out point” from the menu bar in adobe premiere. Here are the steps to do so.
- Just click on the Markers tab from the top menu bar
- select Clear In and Out from the drop-down list.
After clicking it, the Mark In and Out point will immediately disappear.

Method 2: Clear In and Out Points in Premiere By Shortcut Keys
You can also clear up the mark points by clicking some hotkeys. Here are the shortcut keys for both platforms –
Shortcut Keys for Windows to Clear In and Out Points in Premiere
- Press Ctrl + Shift + X keys altogether to clear In and Out points.
- If this doesn’t work, then press Alt + X keys to clear In and Out points.
You can discover more shortcut keys by clicking any tab from the menu bar.

Shortcut Keys for Mac to Clear In and Out Points in Premiere
On Mac or iOS, you can also use shortcut keys to clear up In and Out points. Simply press the Option (⌥) + X key simultaneously to clear In and Out Mark points.

Bonus Tip: Clear All Markers In Premiere
It happens for many users that the mark points don’t disappear even after clicking on the Clear in and out option from the marker menu. In this case, you need to go to the “Marker” tab from the menu bar and select “Clear all Markers”.

You can also right-click on the marked points and select “Clear all Markers” to clear the “mark in and out” points.

There is also a shortcut key to clear all markers. You need to press 4 keys – Ctrl + Alter + Shift + M simultaneously to clear all markers in Adobe Premiere on Windows and press Opt (⌥) + Cmd + M simultaneously on the macOS.

Frequently Asked Questions
How Do I Clear out Markers in Premiere Pro?
To clear Out Markers, Markers > Clear Out. Or you can simply press Ctrl + Shift + O (for Windows OS) and Opt + O (for macOS).
How Do I Clear In Markers in Premiere Pro?
To clear Out Markers, Markers > Clear In. Or you can simply press Ctrl + Shift + I (for Windows OS) and Opt + I (for macOS).
How Do I Change in And out Points in Premiere?
To change the position of in and out points in the premiere, you simply need to click and drag the point while pressing and holding down the “Shift” key. If you want to select the “In” point then press Shift + I, and if you want to select the “Out” point then simply press the Shift + O key.
How Do I Select Marker in Premiere?
To select markers, go to the “Marker” tab on the Adobe Premiere menu bar and select “Mark Selection”. You can also select markers by pressing the “/” key on your keyboard. If you want to go to the next marker, then press Shift +M and if you want to go to the previous marker, then press Ctrl + Shift + M.
Conclusion
Being stuck on how to clear “In” and “Out” points in Adobe Premiere is a common issue for a video editor and solving it is also easier than you think. Hopefully, you can now clear In and Out points in the Adobe Premiere software after reading and following the instructions from this article. You simply need to press Ctrl + Shift + X if you are running the software on your Windows OS and press Opt + X if you are running the software on your Mac. If this doesn’t work for you, then try the other solutions that are given above in this article. For any further queries, please leave a comment in our comment section below.
Subscribe to our newsletter
& plug into
the world of technology


