How Do You Remove a 24 Pin Motherboard Connector?
Removing a 24-pin motherboard connector can seem tricky if you’re new to PC builds. But no worries, with some easy steps you can pull it off with no problem. In a nutshell, you just need to power down, open up the case, release the latch, and steadily pull it out. I’ll walk you through how to safely detach this important connector from the motherboard without damaging any pins. It may look intimidating, but taking it slow and avoiding force is the key. Stick with me and you’ll learn the proper way to remove a 24-pin connector in no time!

Initial Work Need to Do
Before attempting to detach the 24-pin connector, take preliminary steps to prepare the PC. This will allow for easier access and prevention of shorts or electrical damage.
Power Down and Unplug
First and foremost, turn off the computer via the operating system, giving it time to fully power down. Avoid holding the power button for a hard shutdown.
Once powered off, unplug the power supply cable from the wall outlet. This cuts off electrical flow to the components and allows for safer removal of the connectors.
Open the Case
Use a Phillips head screwdriver to unscrew and remove the side panel of the computer case. This exposes the internal components and provides direct access to the 24-pin connector and motherboard.
If there are any case fans or wires blocking the way, carefully move them aside. Avoid tugging or bending the wires too much. Refer to the case and motherboard manuals if needed.
With the computer powered down and the case opened up, you can now work to detach the 24-pin motherboard connector. Move methodically, taking care not to rush or force anything.
Disconnecting the 24-pin connector
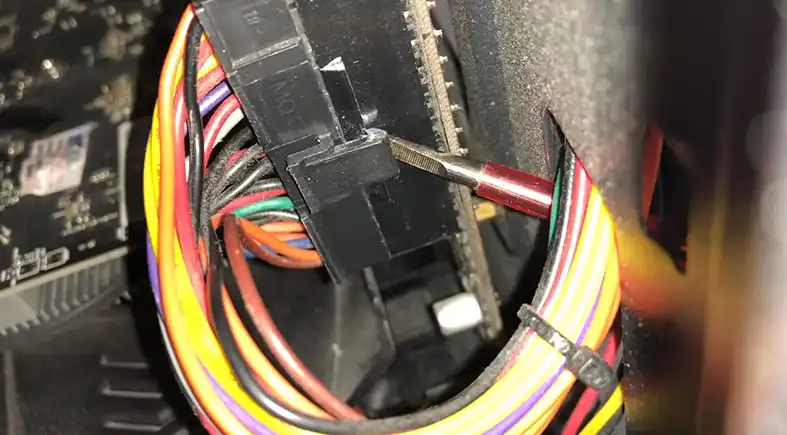
The 24-pin connector has a locking mechanism to keep it firmly attached to the motherboard. To detach it, you’ll need to locate the lock and release it.
Locate the Connector
Visually inspect the connector and locate the lock lever or plastic clip on one side. This is usually colored differently from the connector.
Note which direction you’ll need to push this lever to release the lock. You may need to push it inward or slide it vertically depending on the design.
Release the Lever or Clip
Once located, gently release the locking tab or lever from the motherboard connector. Do not forcefully snap it open.
Slowly slide or press the lock release in the releasing direction. Take care not to break off any plastic clips or levers. If the connector seems stuck, then wiggle the connector horizontally instead of vertically. It will help you to take out the connector with ease. If you wiggle the connector vertically then the connector may stuck more or you may damage the connector.
With the lock disengaged, the connector should move slightly and feel looser in the socket.
Additional Tips for Removal Process
With the lock released, a few additional tips will help the 24-pin smoothly detach from the motherboard.
- Double-check the latch is fully disengaged before attempting to pull the connector. Trying to force it while still locked may damage the pins.
- Use both hands to grasp the connector on opposite sides. This allows equal force to avoid bending any pins.
- Pull straight outward without excessive force if there is remaining resistance. Avoid rocking or twisting the connector.
- If the connector feels firmly stuck, try gently rocking it side to side to loosen the pins from the socket.
- Consult the motherboard manual for specific details like release tabs or removal directions for that model.
- Pull slowly and evenly until the connector detaches. Take care not to bend any pins when removing them.
The 24-pin should detach without too much force if the locking tab is properly released. Avoid brute force which could damage the connector or motherboard.
Set the connector aside safely to prevent pin bending after removal. You can now access the motherboard without the 24-pin power connected.
Reattaching the 24-pin follows these steps in reverse when ready to reconnect power to the motherboard. Take care to fully seat it into the socket and engage the locking tab for a solid connection.
Frequently Asked Questions
What tools do I need to remove the 24-pin connector?
You’ll need a Phillips head screwdriver to open up the PC case and provide access. No specialized tools are needed for removing the connector itself – just pull it out carefully by hand once the locking tab is released.
How do I know if I damaged any pins during removal?
Inspect the 24-pin connector closely under good lighting after removal. Look straight on at each pin row to spot any bent or broken pins. Avoid further use if any pins are damaged until you can replace the connector.
What if the release tab breaks off during removal?
Stop removal if any parts of the locking tab snap off. You may need to carefully pry or rock the connector out if the lock is broken. Take extra care to avoid bending pins without the tab. Replace the connector before reinstalling.
Can I just pull the 24-pin connector straight out by force?
Avoid using excessive force or pulling the connector without releasing the lock first. This risks irreparable damage to the pins and connector. Always methodically unlock and then evenly remove the 24-pin.
How do I reinstall the 24-pin connector securely?
Realign the connector pins with the socket and press straight down firmly until fully seated. Engage the side locking tab until it clicks into place. Verify the connection is solid before restoring power.
End Notes
Removing a 24-pin motherboard connector requires thoughtful preparation and gentle technique to avoid damage. Ensure the PC is powered down, unlock the connector latch, and evenly pull to detach it. Avoid rushing or forceful removal. With care, the 24-pin can be smoothly disconnected and later reattached during upgrades or motherboard replacement. Reference the steps outlined here when preparing to remove this critical power supply connector from the motherboard.
Subscribe to our newsletter
& plug into
the world of technology


