[Fix] The Boot Selection Failed | Required Device Is Inaccessible
The boot selection failed because a required device is inaccessible is an error message reported by the Windows OS user. This error message occurs when you try to boot up your computer. This error message may happen for some reason. The causes behind the error message are given below:
- If there is a connection problem with the hard drive, this error may occur. If the connecting cable is damaged, it causes the error.
- If there is a missing or invalid BCD, it can cause an error message.
- When the BIOS settings of your computer are not correctly configured, it can be a reason for this error message.
These are some reasons for occurring this error message. There are some methods to fix the error.

[Fix]: The Boot Selection Failed Because a Required Device Is Inaccessible
We will discuss several methods to solve this boot selection failed error.
Method 1: Verify the BIOS Boot Order
Step 1: First, you have to restart your computer. When the computer restarts, you have to enter BIOS Setting. For this, you have to find the BIOS setup key and press it on your keyboard to open the BIOS setup. It is generally F1, F2, ESC, Del to enter the BIOS setup.
Step 2: Then, you have to select the systems boot tab.
Step 3: Now, you have to make sure that the system disk is selected. You have to select the right disk for your primary boot devices such as a USB drive or CD /DVD.
Step 4: Finally, you have to save the changes and restart your system to check the error.
Method 2: Run DSKCHK Available in Recovery Media
Step 1: First, you have to start your device from the Installation Disc like USB flash drive.
Step 2: Then, you have to install your installation disc into your system. For this, you have to go to the time, language, keyboard panel, and select “Repair your Computer.”

Step 3: Now, you have to open the Command Prompt on your computer. For this, you have to click on the Start and select the command prompt from the menu.
Step 4: Once the command prompt appears, you have to type chkdsk C:/f in the command line.


Step 5: Finally, you have to reboot your system and see whether the problem is resolved.
Method 3: Restart the PC’s BIOS
Step 1: First, you have to search for the battery. You have to check the documentation of the system to find it.
Step 2: Then, you have to remove the battery. You have to keep the battery aside for about 10 minutes and again insert it.
Step 3: Finally, you have to boot into BIOS and check the error.
Method 4: Use the Startup Repair Feature
Step 1: First, you have to boot your system from the installation disc.
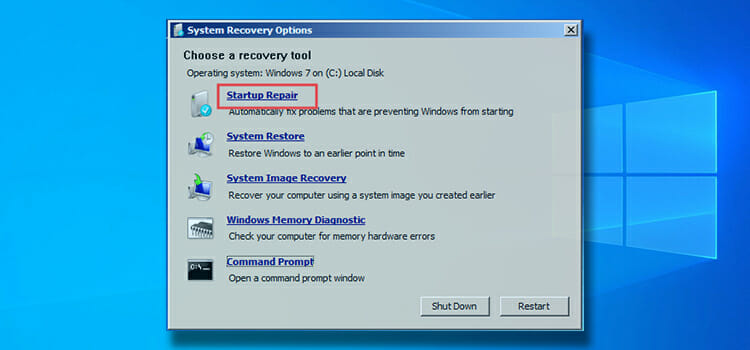
Step 2: Then, you have to select “Startup Repair”. It will automatically start to scan your PC for any problems and also repair them.

Step 3: Finally, you have to restart your computer and check the issue.
Method 5: Run Startup Repair With Windows Installation Drive
Step 1: First, you have to insert the Windows installation CD/DVD or usb drive and restart the computer.
Step 2: Then, you have to boot to the disc. You can press any key to boot the disc.

Step 3: Now, you have to choose a language and then click on the Repair your computer. There, you have to choose Troubleshoot.
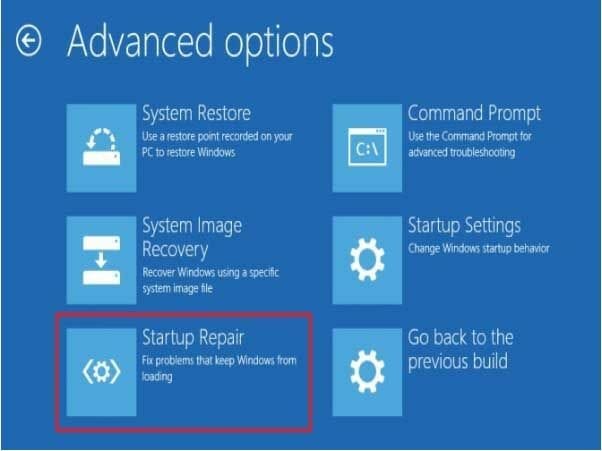
Step 4: Next, you have to select Advanced Options and then click on the Startup Repair (or Automatic Repair) in sequence.

Step 5: After that, you have to follow the instructions that appear on your screen and complete the process.
Step 6: Finally, you have to restart your PC and check the issue.
Method 6: Mark Your Disk Online
Step 1: First, you have to install and launch DiskGenius on your computer. You have to download the free version of the software.
Step 2: Then, you have to insert a USB disk into this PC.
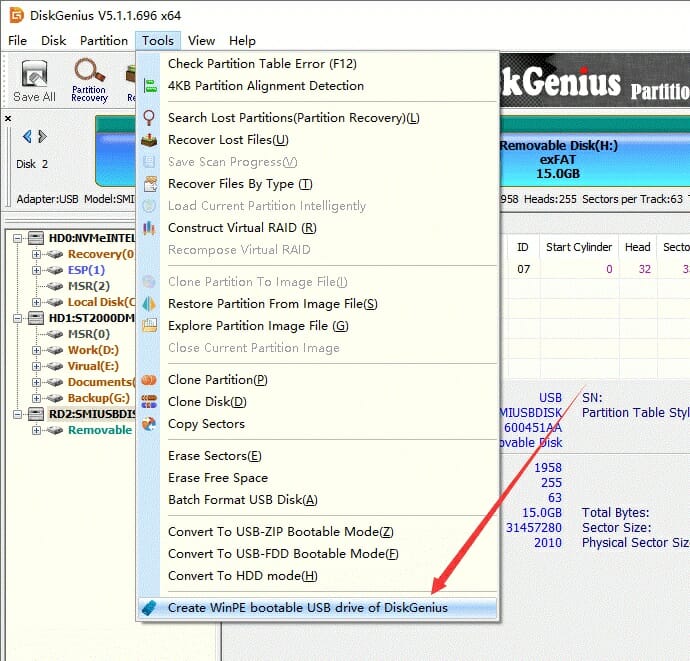
Step 3: Once the software opens, you have to click on Tools at the top of the window. There, you have to select Create WinPE bootable USB drive of DiskGenius from the menu.

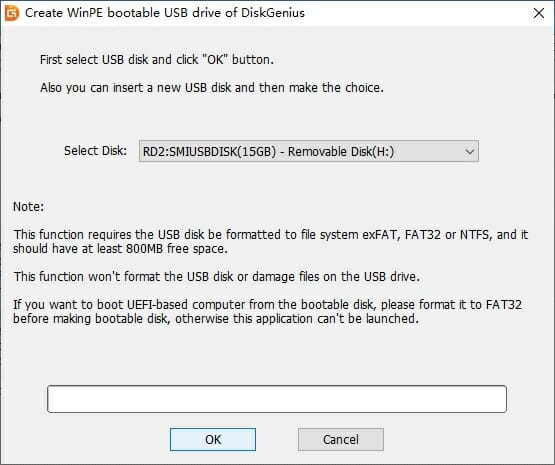
Step 4: Now, you have to click the OK button and wait to create the bootable USB disk.

Step 5: After that, you have to insert the bootable disk into the computer and enter BIOS. You have to make the disk in the first boot order.
Step 6: Then, you have to restart your computer and it will boot from the USB disk.

Step 7: Finally, you have to select the offline disk In DiskGenius and click Disk. Then, you have to select Change Device State and Online.

Method 7: Test Hard Disk
Step 1: First, you have to select the disk at the top of the DiskGenius. There, you have to select the View S.M.A.R.T. Information option from the menu.


Step 2: Then, you have to check and repair disk bad sectors. You have to select the disk which you want to scan and click Disk at the top. And, you have to select Verify Or Repair Bad Sectors from the menu.

Step 3: Finally, you have to click the Start Verify button to scan the disk. You have to wait to complete the process.

Method 8: Rebuild BCD
Step 1: First, you have to boot the computer and then, you have to enter Windows Recovery Environment which is like Android recovery mode. You can boot your computer from the installation disc and you have to select the language, time, and keyboard input.
Step 2: Then, you have to choose to Repair your computer.
Step 3: Now, you have to enter the System Recovery Options page. There, you have to click Command Prompt.
Step 4: Once, you open the command prompt, you have to type the command bootrec /rebuildbcd in the command line and press Enter.

Step 5: Finally, you have to wait to complete the process and check the error.
Method 9: Fix the Error With DVD
Step 1: First, you have to connect an external DVD-Drive.
Step 2: You have to go to the Bios Setup and select start from CD-DVD.
Step 3: Now, you have to run the System recovery from the Recovery Partition. When Windows starts to set up, you have to disconnect the Wi-Fi connection from your computer.
Step 4: Next, you have to create a System Repair Disk. For this, you have to click on the Start Menu, All Programs, Maintenance, Create a System Repair Disc respectively. You have to use a blank DVD-RW disk.
Step 5: Finally, you have to then reboot your computer.
Conclusion
These methods are very simple and quick to fix the error message. This error message will come to your screen continuously until you fix the error. Sometimes, bad factors also cause the error. So, you have to find the reason why the error is occurring and apply the method. We hope we gave you a clear idea to solve this boot selection failed error.
Subscribe to our newsletter
& plug into
the world of technology


