[Fix] Emerson TV Won’t Find Channels (100% Working)
Currently, you are facing the Emerson TV won’t find channels error, right? You have searched for the relevant solution here and there. Unfortunately, you could not find the proper one.
The good news is that you have come to the right place. In this entire article, I will discuss all possible facts with the relevant and compact solution to the error.
Hopefully, you will resolve the error and enjoy your desired channels on your Emerson TV after exploring the article.

Why Is Emerson TV Not Finding Any Channels?
The error may occur because of several reasons. You can find them in the below list. Hopefully, you will understand and relate the error causes from here.
- Auto channel scan may not be completed or may be interrupted
- The channels may not be broadcasting at your location
- The problem may be raised by the V-chip setting
- Missing the unit required antenna input
How to Fix if ‘Emerson TV Won’t Find Channels’
Whatever the reason is, the issue is resolvable. You can solve it by applying some proven fixes. I will disclose all of them in detail. Before that, let’s check the list first-
- Fix 1: Perform Auto Channel Scan
- Fix 2: Execute Manual Register
- Fix 3: Antenna Confirmation
- Fix 4: Check V-chip Settings
Fix 1: Perform Auto Channel Scan
First thing, you have to ensure the auto channel scan. It must be completed both in the first setup or after moving new location to avoid the channel not finding the issue.
From a general point of view, you will need to execute an auto channel scan if you restore the deleted DTV channel or switch wires between antenna and CATV (Cable television), or take the unit to a different area after the initial setting.
How to Scan for Channels on Emerson TV?
There are several steps to executing an auto channel scan. Before performing it, you have to make sure that the unit is properly connected to the antenna or cables. I will describe the process in detail below.
Step 1
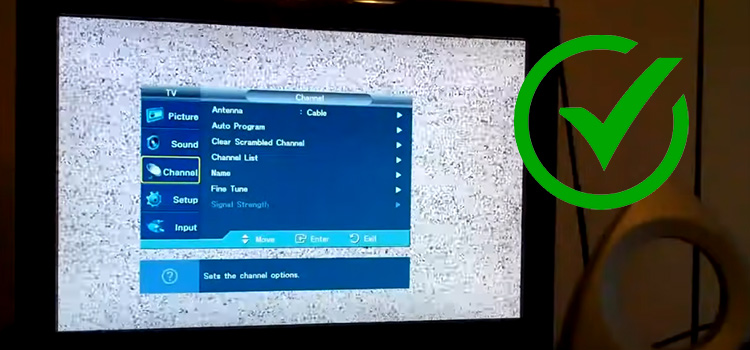
First, you have to tap the ‘SETUP’ key. Accordingly, you will get the main menu access on the display.
Step 2
Next, select the ‘CHANNEL’ from the appeared options by using the cursor button. In the end, hit ‘ENTER’ to submit the confirmation.
Step 3
Then you have to choose ‘Autoscan’. While selecting, you need to press ‘ENTER’.
Now the time is to select the appropriate option-
- If an aerial antenna is connected, you will have to select the option- ‘Air’.
- If it is CATV, you should go for the ‘Cable’.
After the selection, you have to press ‘ENTER’. As a result, scanning and memorizing channels will start automatically.
If the auto channel scan does not find the channels, you will try it from the manual register. I will describe the manual registration process in the next fix.
Fix 2: Execute Manual Register
Due to the reception condition at the initial setting, auto channel scan may not add the channels. Here, the manual register function will help you to add the channels. You can follow the below steps to execute the function.
Step 1
Tap the ‘SETUP’ button to access the main menu on the TV display.
Step 2
Then, you have to select ‘CHANNEL’. Use cursor buttons to do so. Finally, hit the ‘ENTER’ key to confirm the selection.
Step 3
Consequently, you will see the ‘Manual Register’ option on the appeared list. Again, you need to use cursor buttons to select it and press ‘ENTER’ to confirm.
Step 4
Now, you have to enter the number of the channel you want to add. Then, tap the ‘ENTER’ at the end. As a result, the newly added channels will be displayed in the channel list.
Here is a caution- you can not register any channel if any external input is being used.
Fix 3: Antenna Confirmation
In most cases, the issue has been solved by changing the cable from the antenna. At the same time, you may need to plug rabbit ears (indoor antenna), external antenna, or RF coaxial cable into the unit to resolve the issue.
Here in the below, I will disclose the checking process of antenna confirmation.
Step 1
Firstly, you need the main menu access. To do so, press the ‘SETUP’ button.
Step 2
Then, you have to select ‘CHANNEL’ by using cursor buttons and press ‘ENTER’ at the end.
Step 3
Next, select ‘Antenna’ by following the same process alike using cursor buttons and pressing ‘ENTER’.
Step 4
Now you will be allowed to check the antenna condition.
There is another issue that may occur the error. I will discuss it in the next fix.
Fix 4: Check V-chip Settings
Sometimes, checking V-chip settings can help you to resolve the error. You can follow the below steps to check the settings.
Step 1
Tap the ‘SETUP’ button. Consequently, the main menu will be visible on the screen.
Step 2
Then, you have to select the ‘DETAIL’ option. Use the cursor buttons to do so. Once you find ‘DETAIL’, press the ‘ENTER’ key.
Step 3
From the appeared DETAIL options, you have to select ‘V-chip’ and press ‘Enter’.
Step 4
In this step, you need to input the password to access the V-chip setting. If you have not set the password previously, you will have used four zero (0000).
Step 5
After that, you need to select the ‘TV Rating’ option by using cursor buttons and pressing ‘ENTER’ at the end.
Step 6
Here you need to check the rating status whether it is selected as block or view. By pressing ‘ENTER’ repeatedly, you can change the selection.
Frequently Asked Questions (FAQs)
Why I Can Not Watch Some of the TV Programs?
Basically, there are several reasons. One of the possible reasons is that those TV programs may be blocked from the V-set Settings.
Why Is My TV Not Picking Up Antenna Channels?
Your TV is not picking up antenna channels because the signal isn’t strong enough. It can happen for physical blocking or a far distance from the broadcast location.
Final Words
Thus, I assume that you would get rid of the Emerson TV won’t find channels error after applying the fixes provided in the article. Additionally, I would like to inform you that only changing the antenna cable can make a difference many times.
Subscribe to our newsletter
& plug into
the world of technology


